🤖The Complete Guide to AI Programming
Online + local dual-mode AI programming allows AI to fully understand your V8 API and database structure, and the accuracy rate of interface engine code generation is as high as 99%
🎯Why is it said that Microi has achieved true AI low-code development?
The traditional low-code "AI ability" stays on the surface of building tables and forms, while Microi code has chosen a more essential path:
V8 interface engine = standard JavaScript back-end code,AI is best at writing code.
- The interface engine code is the standard JavaScript,AI can be generated directly and with high accuracy.
- Feed the database table structure, field meaning, and menu relationship to the AI with one click, and AI will be able to accurately understand your business data.
- Online AI Programming:Use DeepSeek / ChatGPT / Kimi and other tools to write code in the browser and copy and paste it into the platform.
- Local AI Programming:VS Code GitHub Copilot / Claude Code / Cursor, knowledge base is automatically injected, code writing → execution → debugging is completed in the editor without leaving
- Calling AI large model from V8 code:ReAct mode is implemented by directly requesting interfaces such as DeepSeek in the interface engine.
blogger's MES project: 500 + tables, a large number of interface engines are generated by AI at one time, with an accuracy rate of * * 99% * *.
Mode one:🌐Online AI Programming
Open any AI tool in your browser, upload the V8 engine document your database structure, AI directly write out the available interface engine code.
Step 1: Export the database structure (db.json)
VS Code plug-in (Microi code) supports * * one-click pull * * database structure, see [mode 2](# mode 2-local-AI-programming vs-code-plug-in).
If you operate in the platform Web interface, you can create a new interface engine, paste and execute the following code, and returnDataSave asdb.json:
Expand to view the interface engine code for obtaining the database structure
var tables = V8.FormEngine.GetTableData('diy_table', {
    _PageSize: 10000, _OrderBy: 'Name', _OrderByType: 'ASC',
    _SelectFields: ['Id', 'Name', 'Description']
});
if (tables.Code != 1) return { Code: 0, Msg: tables.Msg };

var fields = V8.FormEngine.GetTableData('diy_field', {
    _PageSize: 100000, _OrderBy: 'TableId', _OrderByType: 'ASC',
    _SelectFields: ['Id', 'Name', 'Label', 'Description', 'Type', 'Component', 'TableId', 'Config']
});
if (fields.Code != 1) return { Code: 0, Msg: fields.Msg };

var menus = V8.FormEngine.GetTableData('sys_menu', {
    _PageSize: 10000,
    _SelectFields: ['Id', 'Name', 'ParentId', 'DiyTableId']
});

// 构建字段映射
var fieldMap = {};
for (var i = 0; i < fields.Data.length; i++) {
    var f = fields.Data[i];
    var cfg = {};
    try { cfg = JSON.parse(f.Config || '{}'); } catch(e) {}
    if (!fieldMap[f.TableId]) fieldMap[f.TableId] = [];
    fieldMap[f.TableId].push({
        Id: f.Id, Name: f.Name, Label: f.Label,
        Description: f.Description, Type: f.Type, Component: f.Component,
        ChildTableId: cfg.TableChildTableId, ChildSysMenuId: cfg.TableChildSysMenuId
    });
}

// 构建菜单树
var menuMap = {};
for (var m = 0; m < menus.Data.length; m++) {
    menuMap[menus.Data[m].Id] = menus.Data[m];
}
var menuTree = [];
for (var m2 = 0; m2 < menus.Data.length; m2++) {
    var menu = menus.Data[m2];
    if (!menu.ParentId) {
        menu._Child = [];
        menuTree.push(menu);
    }
}
for (var m3 = 0; m3 < menus.Data.length; m3++) {
    var menu2 = menus.Data[m3];
    if (menu2.ParentId && menuMap[menu2.ParentId]) {
        if (!menuMap[menu2.ParentId]._Child) menuMap[menu2.ParentId]._Child = [];
        menuMap[menu2.ParentId]._Child.push(menu2);
    }
}

var resultTables = [];
for (var t = 0; t < tables.Data.length; t++) {
    var tbl = tables.Data[t];
    resultTables.push({
        Id: tbl.Id, Name: tbl.Name, Description: tbl.Description,
        Fields: fieldMap[tbl.Id] || []
    });
}

V8.Result = { Tables: resultTables, Menus: menuTree, Summary: '共 ' + resultTables.length + ' 张表' };Prompt:For a database with 600 tables and 10000 fields, the structural data is only * * ~ 300KB * *, which is obtained in less than 1 second. the formated' db.json' is about 2MB.
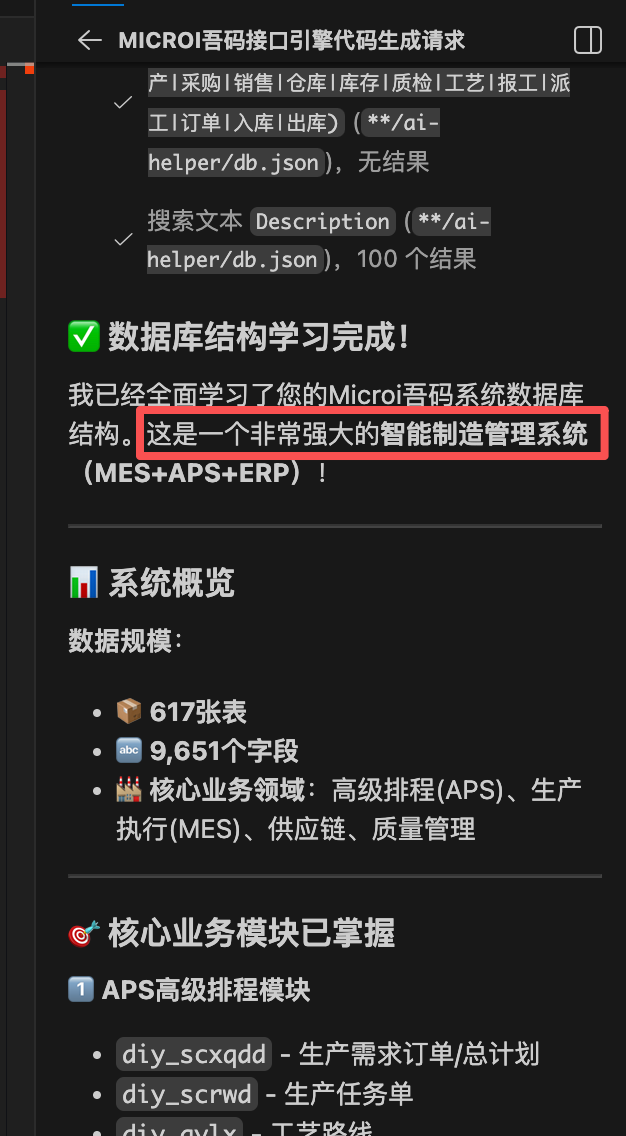
Step 2: Let AI learn the document database structure
In a new AI session, upload the following content (for example, Claude / DeepSeek supports uploading files):
- Platform V8 engine documentation (in this code warehouse
docs/doc/v8-engine/below):api-engine.md(Interface Engine Overview)v8-server.md(V8 Global Object Reference)form-engine.md(Form Engine CRUD)where.md(Query Condition Syntax)
- Your database structure file.
db.json
usage suggestion
- Strongly recommended:Complex business logic opens a new session for each interface to avoid context loss.
- The second session can directly reuse the same one.
db.json, do not need to re-export - When using [local AI mode](# mode two-local-AI-programming vs-code-plug-in), the knowledge base is fully automatic maintenance by VS Code plug-in **, and there is no need to upload it manually.
Step 3: Use the description to let the AI write the interface engine
Give AI a standard opening statement (copy the template below) and describe your business logic:
Expand to view the Describe Business Logic standard prefix template
现在讲我需要实现的业务逻辑,请帮我写好相关接口引擎代码:

在写接口引擎代码之前,请先阅读以下注意事项:
1. 假如你没理解我描述的业务逻辑,请不要先生成代码,先和我沟通确认,
   目标是代码一次执行成功,而不是反复试错。
2. 所有表名、字段名请严格从 db.json 中查找,不要凭空猜测。
3. 注意性能:大数据量表应先查全量数据,在内存中做关联判断,
   不要在循环内多次查询数据库。
4. V8.FormEngine 不支持关联查询,需要关联时请用 V8.Db.FromSql()。
5. 所有写库操作都用 V8.DbTrans,保证自动提交/回滚。
6. 若需要进度跟踪,用 V8.Cache,Key 以 `Microi:{V8.OsClient}:` 开头。Example effect
Case 1:An interface engine for batch scheduling. After describing the business logic, it is completed through * * 2~3 rounds of dialogue * *, with 100% accuracy.
Case 2:An interface engine for cross-system data migration (INSERT/CREATE TABLE SQL is generated with transactions). Once generated successfully.
Mode two:💻Local AI Programming (VS Code Plugin)
This is a new integrated development mode brought about by this update: * * Directly use GitHub Copilot / Claude Code / Cursor to write the interface engine in VS Code, and the knowledge base is automatically injected without leaving the editor.**
Working principle
安装 VS Code 插件「Microi吾码」
        ↓
  登录并点击「拉取」
        ↓
  插件自动完成:
  ① 拉取所有接口引擎 .js 到本地
  ② 拉取所有 V8 事件 .js 到本地
  ③ 拉取数据库结构(表名 / 字段名 / 字段描述 / 菜单结构)
        ↓
  自动生成 AI 知识库文件(放在本地工作区):
  • .github/copilot-instructions.md  ← GitHub Copilot 读取
  • CLAUDE.md                        ← Claude Code 读取
  • .cursorrules                     ← Cursor 读取

  知识库内容包含:
  ✅ V8 引擎全部 API(FormEngine / Db / Cache / Http / ApiEngine 等)
  ✅ _Where 查询条件语法
  ✅ 你的数据库所有表结构(表名 / 字段名 / 类型 / 业务说明)
  ✅ 菜单树结构(哪个菜单对应哪张表)
        ↓
  打开任意 .js 接口引擎文件
        ↓
  GitHub Copilot / Claude Code / Cursor 自动获得完整上下文
  → 直接 AI 辅助编写接口引擎代码,无需额外的"喂文档"步骤
        ↓
  保存 → 自动推送到数据库(或手动 Ctrl+S)
远程执行 / 远程逐行调试,全在 VS Code 内完成Install plugin
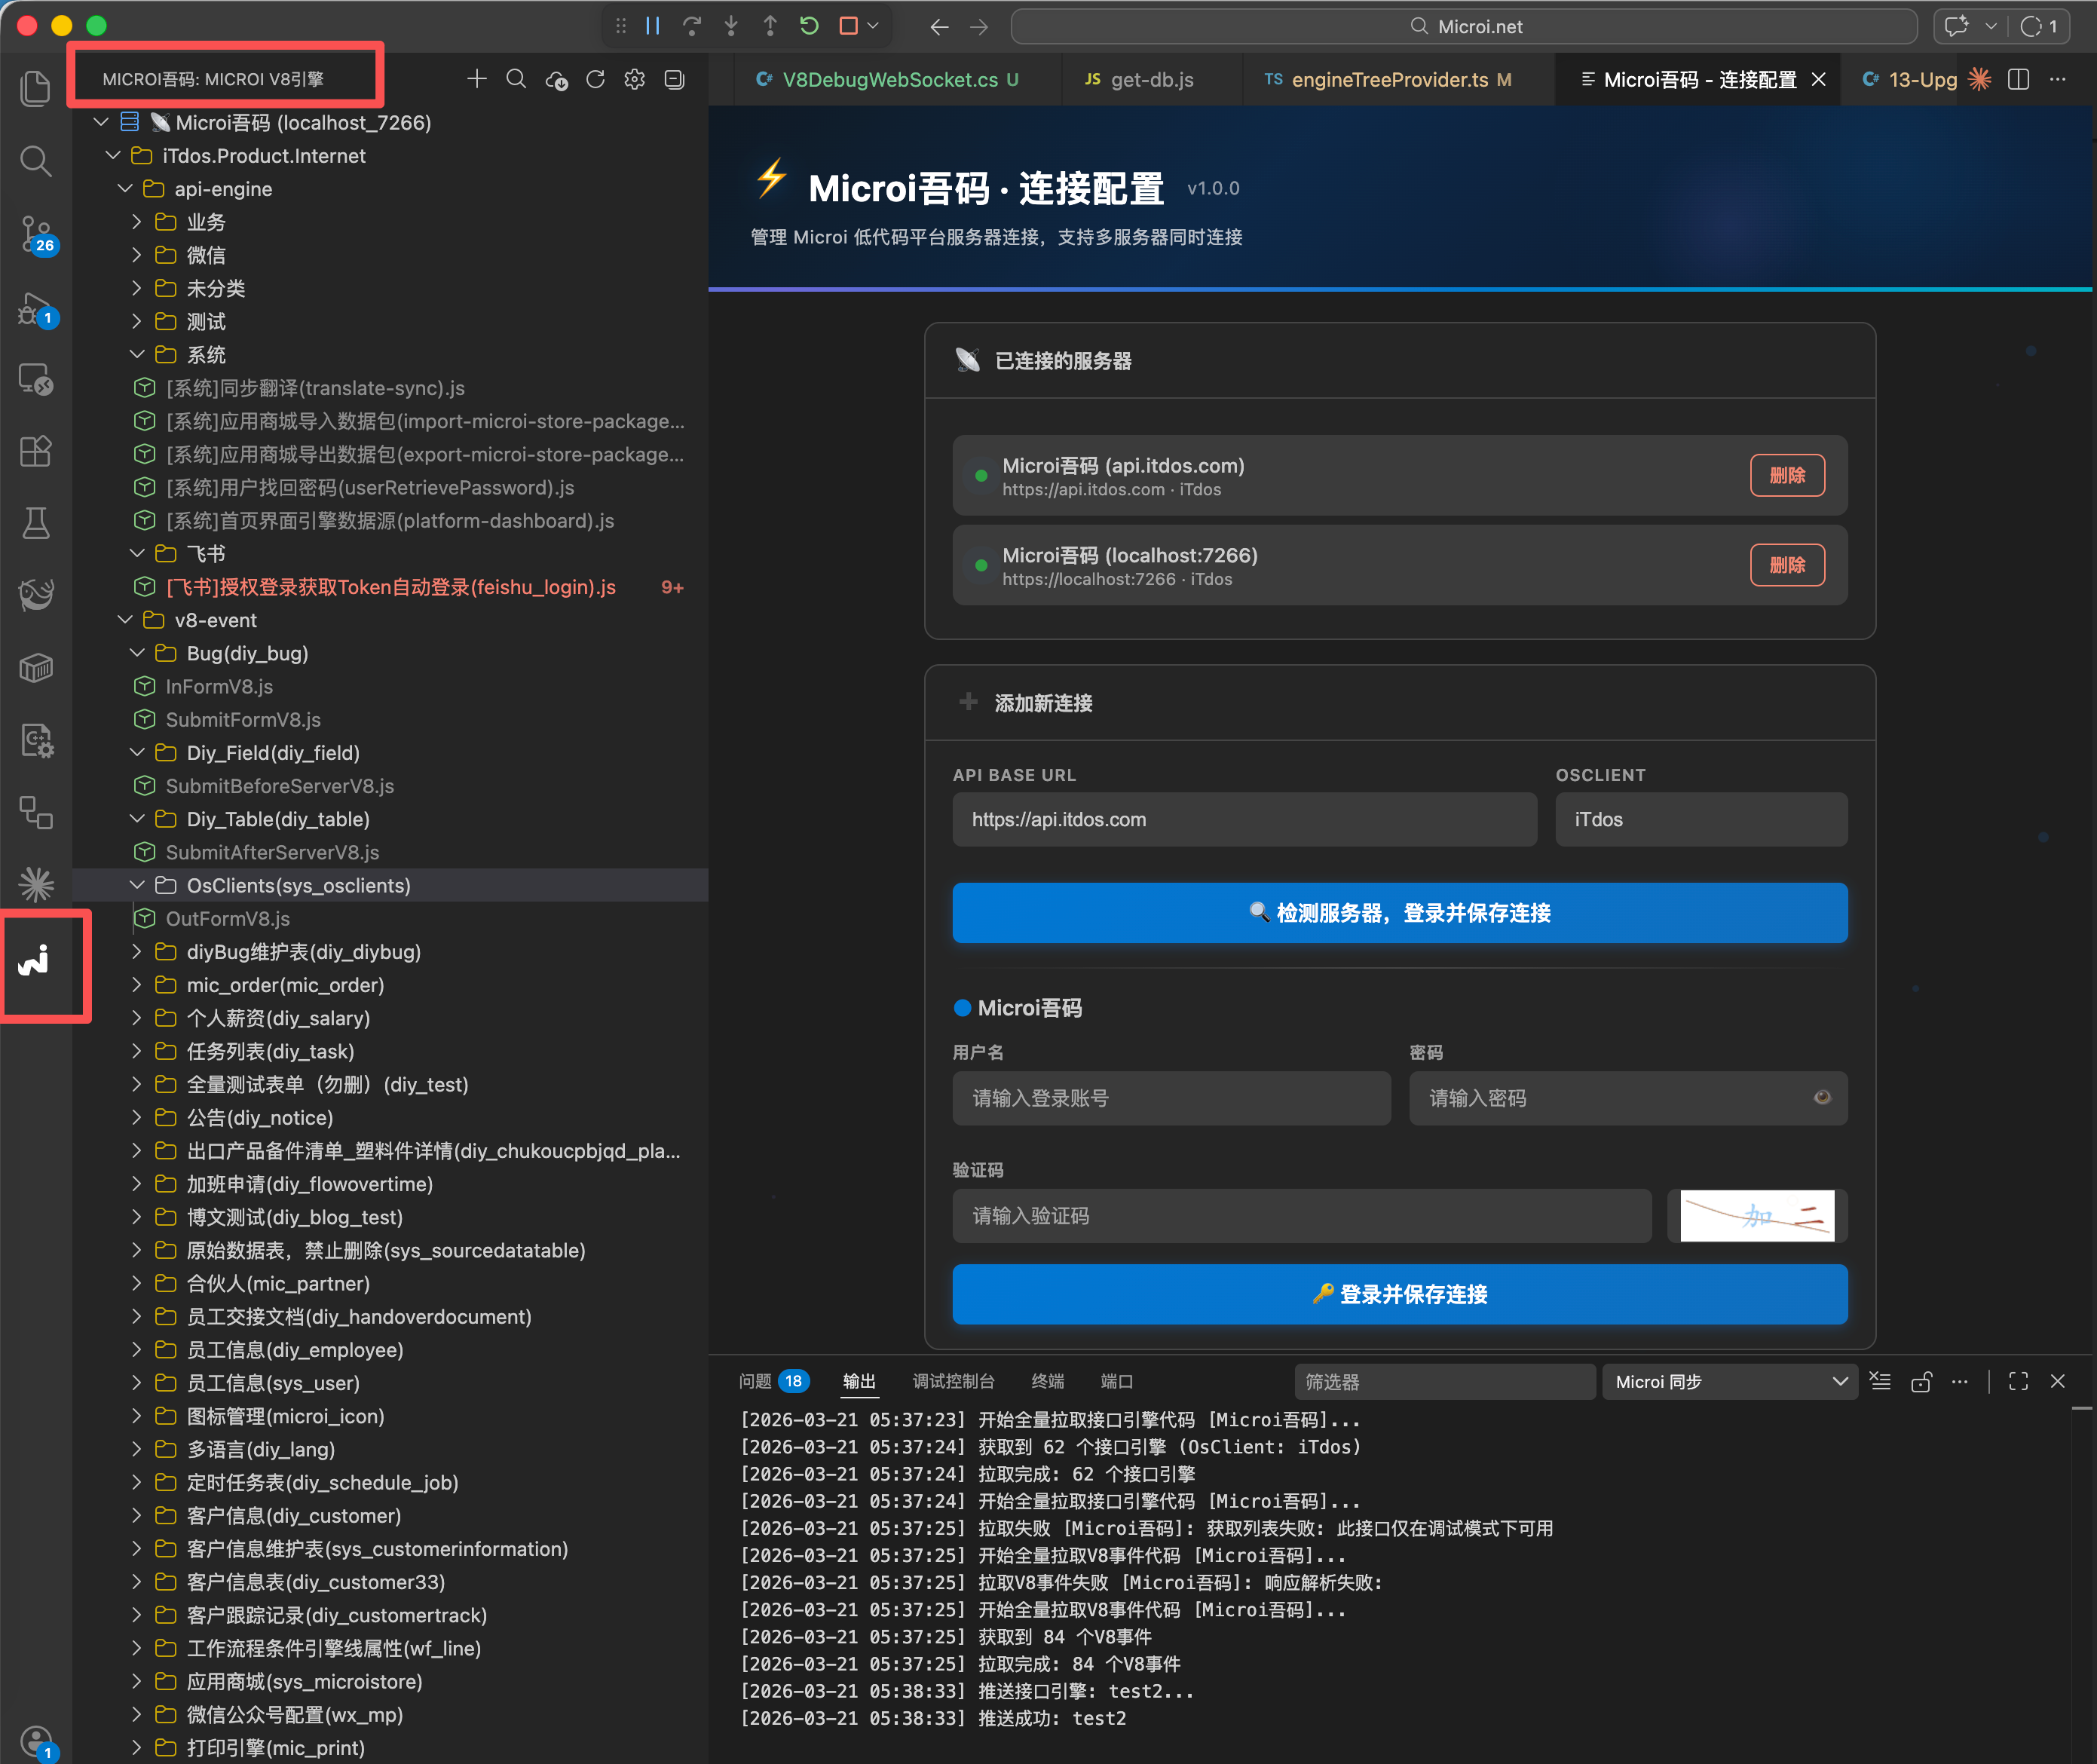
Search for **Microi Code * * installation in VS Code extension market, or download from OpenClaw.vsixFiles are installed manually.
One-click pull automatically establishes knowledge base
After logging in successfully, click the ↓ (Pull) button at the top of the Microi sidebar on the left, or execute the command:
Microi: 拉取V8引擎代码The plug-in does the following automatically (supports multi-server concurrency):
| Steps | Content |
|---|---|
| ① Pull Interface Engine | Save all 'ApiEngineKey.js' to local directory |
| ② Pull V8 event | All form V8 events '.js' are saved to a local directory |
| ③ Pull the database structure | Pull table name, field name, type, description and menu tree together |
| ④ Automatically generate knowledge base | 'copilot-instructions.md ' / 'CLAUDE.md' / '.cursorrules' |
After the knowledge base is generated, you open any in VS Code..jsfile, the AI assistant already knows:
- V8 引擎完整 API(不需要你手动告诉 AI 怎么用
V8.FormEngine.GetTableData) - 你的数据库表结构(AI 知道你的表叫什么,字段叫什么,业务含义是什么)
- _Where 条件用法(AI 能自动写出正确的查询条件)
Write code → execute → debug, full closed loop
| Operation | Method |
|---|---|
| AI-assisted code writing | Copilot autocomplete, or enter requirements in Copilot Chat / Claude Code |
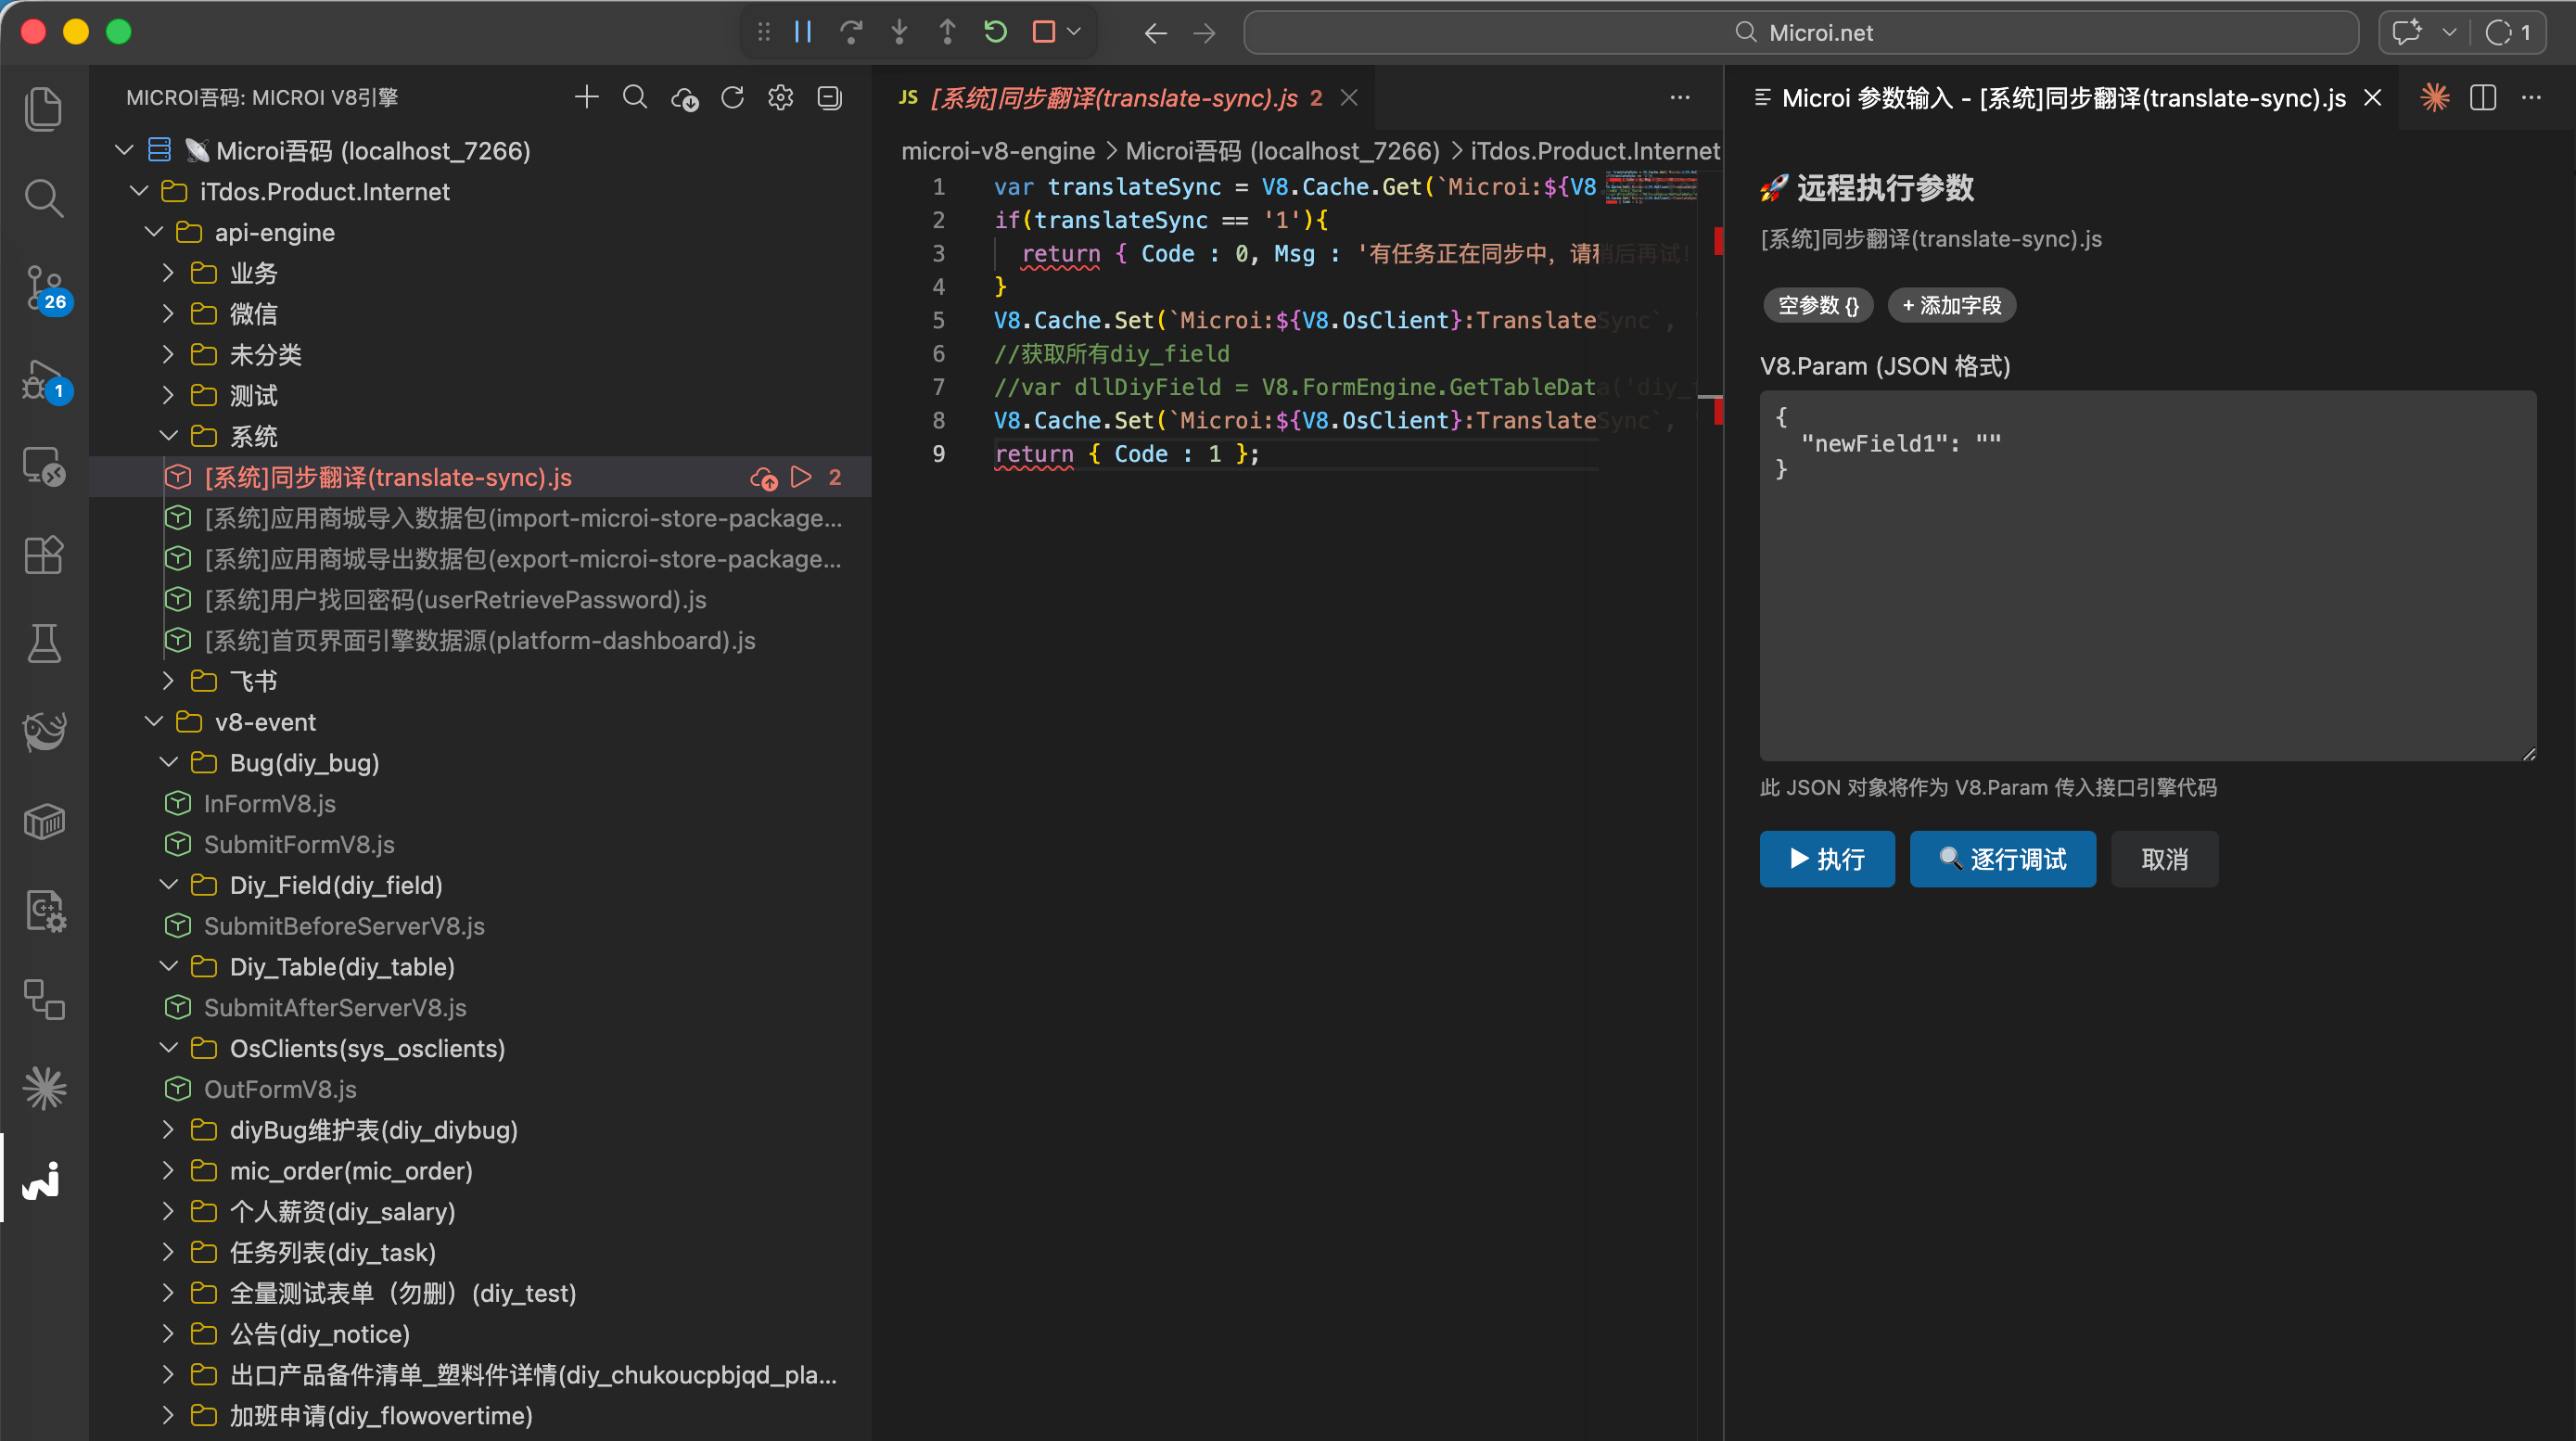
| Remote Execution | Right-click → 'Microi: remotely execute the current interface engine' (pop-up parameter input box) |
| Line-by-line debugging | Right-click →'Microi: Remote Line-by-Line Debuging', support breakpoint/Step Over/variable observation |
| Push Save | Automatically synchronize to the database when the file is saved, no need to compile and publish |
Update AI knowledge base individually
After the database structure changes, there is no need to re-pull all the code and execute it separately:
Microi: 拉取数据库结构到AI知识库The three knowledge base files can be updated, allowing AI to immediately perceive the latest table structure.
Efficiency comparison
| Development mode | Prepare Context | Write code | Perform debugging | Push deployment |
|---|---|---|---|---|
| Traditional handwriting | None | Handwritten | Open Browser Platform | Browser Platform |
| Online AI Programming | Upload document db.json manually | AI Copy and Paste | Browser platform | Browser platform |
| Local AI programming (recommended) | Fully automatic, automatically generated when pulling | AI live assist in VS Code | Execute/Debug within VS Code | Save Auto Push |
Mode three:🔗Calling a Large AI Model in V8 Code
In addition to having AI write the code, you can also call the AI interface directly inside the interface engine to implement AI-driven business logic.
// 示例:在 V8 事件中自动检查代码是否有问题
var option = {
    url: V8.SysConfig.ApiBase + '/api/ai/chat',
    data: {
        UserChatMsg: `帮我快速检查一下这段JavaScript代码是否有问题:\n${V8.Form.ApiV8Code}`,
        AiModel: 'deepseek-r1:1.5b',
    },
    dataType: 'json',
    success: function(result) {
        if (result.Code == 1) {
            V8.FormSet('AiCheckResult', result.Data);
        } else {
            V8.FormSet('AiCheckResult', result.Msg);
        }
    }
};
V8.Post(option);You can also call in the interface engine:
// 在接口引擎中调用 AI 做自然语言转 SQL
var aiResult = V8.Http.Post(
    V8.SysConfig.ApiBase + '/api/ai/chat',
    JSON.stringify({
        UserChatMsg: '帮我把这段需求转换成 SQL:' + V8.Param.UserInput,
        AiModel: 'deepseek-r1:7b',
    }),
    { 'Content-Type': 'application/json', 'Authorization': 'Bearer ' + V8.CurrentToken }
);
var sql = JSON.parse(aiResult).Data;
var rows = V8.Db.FromSql(sql).ToList();
V8.Result = rows;💡Best practices
Before writing complex business interfaces
- First perform a pull to keep the knowledge base up to date (when there are changes to the database)
- Describe the requirement in Copilot Chat or Claude Code and attach the relevant table name
- Each complex interface opens a new AI session to prevent context dilution.
- Let AI understand the business first, then write the code, communicate first when they encounter questions, and don't guess while writing.
- After generation, use "remote execution" to quickly verify. If there are any problems, AI will continue to modify the screenshots.
field names must be looked up by the AI from the database structure.
No matter in online or local mode, AI should be clearly told: * * Please find the field name from the database structure file (db.json or knowledge base). Don't guess the field name out of thin air, which is the main cause of the error.
Usage suggestions
- Online AI support upload
.mdDocuments anddb.jsonFile learning, usually a few seconds to complete - Strongly recommended:For complex business logic, initiate a new session for each API call to prevent context loss.
- The second session can directly use the first generated
db.json, as efficient as the multi-session write interface.
AI generated interface engine code (one-time test successful, 100 percent accurate)
AI generated interface engine code
/**
 * Microi吾码数据库结构获取接口引擎
 *
 * 功能:获取数据库的表结构和字段信息
 * 包括:
 * 1. diy_table - 数据库所有表及说明
 * 2. diy_field - 数据库所有字段及说明
 *
 * 使用说明:
 * 1. 在Microi吾码平台的【接口引擎】中创建一个新接口
 * 2. 将此代码粘贴到接口引擎的V8代码编辑器中
 * 3. 配置接口引擎Key为:get_db_structure
 * 4. 配置自定义接口地址为:/apiengine/get-db-structure
 * 5. 根据需要配置是否允许匿名调用
 * 6. 运行后将返回的JSON数据保存到 db.json 文件
 *
 * 调用方式:
 * GET/POST: {ApiBase}/apiengine/get-db-structure
 *
 * 返回格式:
 * {
 *   Code: 1,
 *   Data: [{
 *     Id: "01KEMDAT9ARD75943VSCB7B4J6",
 *     Name: "table1",
 *     Description: "表1",
 *     _Fields: [{
 *       Id: "01KEMDAVG6H7HSN6WWVRYK2NPR",
 *       Name: "CreateTime",
 *       Label: "创建时间",
 *       Description: null,
 *       Type: "datetime",
 *       Component: "DateTime"
 *     }]
 *   }],
 *   Msg: '获取成功'
 * }
 */

// 定义调试模式
var isDebug = true;
var debugLog = {};

try {
    // 1. 获取 diy_table 表数据(数据库所有表及说明)
    debugLog.step1 = '开始获取diy_table表数据';
    var diyTableResult = V8.FormEngine.GetTableData('diy_table', {
        _Where: [],  // 取所有数据,不添加任何条件
        _PageSize: 10000,  // 设置较大的分页大小,确保获取所有数据
        _OrderBy: 'Name',  // 按表名排序
        _OrderByType: 'ASC',
        _SelectFields: ['Id', 'Name', 'Description']  // 只获取关键字段
    });

    if (diyTableResult.Code != 1) {
        debugLog.diyTableError = diyTableResult.Msg;
        return {
            Code: 0,
            Msg: '获取diy_table表数据失败:' + diyTableResult.Msg,
            DataAppend: {
                DebugLog: isDebug ? debugLog : null
            }
        };
    }
    debugLog.diyTableCount = diyTableResult.Data.length;

    // 2. 获取 diy_field 表数据(数据库所有字段及说明)
    debugLog.step2 = '开始获取diy_field表数据';
    var diyFieldResult = V8.FormEngine.GetTableData('diy_field', {
        _Where: [],  // 取所有数据
        _PageSize: 10000,
        _OrderBy: 'TableId',  // 按关联表ID排序
        _OrderByType: 'ASC',
        _SelectFields: ['Id', 'Name', 'Label', 'Description', 'Type', 'Component', 'TableId']  // 只获取关键字段
    });

    if (diyFieldResult.Code != 1) {
        debugLog.diyFieldError = diyFieldResult.Msg;
        return {
            Code: 0,
            Msg: '获取diy_field表数据失败:' + diyFieldResult.Msg,
            DataAppend: {
                DebugLog: isDebug ? debugLog : null
            }
        };
    }
    debugLog.diyFieldCount = diyFieldResult.Data.length;

    // 3. 将字段数据组装到对应的表数据中
    debugLog.step3 = '开始组装数据';

    // 构建字段映射表(按TableId分组)
    var fieldMap = {};
    for (var i = 0; i < diyFieldResult.Data.length; i++) {
        var field = diyFieldResult.Data[i];
        var tableId = field.TableId;

        if (!fieldMap[tableId]) {
            fieldMap[tableId] = [];
        }

        fieldMap[tableId].push({
            Id: field.Id,
            Name: field.Name,
            Label: field.Label,
            Description: field.Description,
            Type: field.Type,
            Component: field.Component
        });
    }

    // 组装表数据
    var resultData = [];
    for (var j = 0; j < diyTableResult.Data.length; j++) {
        var table = diyTableResult.Data[j];
        var tableId = table.Id;

        // 为每个表添加 _Fields 字段
        resultData.push({
            Id: table.Id,
            Name: table.Name,
            Description: table.Description,
            _Fields: fieldMap[tableId] || []  // 如果该表没有字段,则返回空数组
        });
    }

    debugLog.step4 = '数据组装完成';
    debugLog.resultCount = resultData.length;

    // 返回结果
    return {
        Code: 1,
        Data: resultData,
        Msg: '获取数据库结构成功',
        DataAppend: {
            DebugLog: isDebug ? debugLog : null,
            Summary: {
                description: 'Microi吾码数据库结构',
                tableCount: diyTableResult.Data.length,
                fieldCount: diyFieldResult.Data.length,
                exportTime: new Date().toISOString()
            }
        }
    };

} catch (error) {
    // 异常处理
    debugLog.error = error.message || error.toString();
    return {
        Code: 0,
        Msg: '获取数据时发生异常:' + (error.message || error.toString()),
        DataAppend: {
            DebugLog: isDebug ? debugLog : null
        }
    };
}Execute the interface engine code of [Get Database Structure]
- You can press before executing the above interface engine request
F12, right-click to copy after the request endsDatato get the full database structure.- Blogger one of the projects
600多张表、1万个字段The database structure is also300多KB, less1秒钟You can get the database structure, and the formatteddb.jsonThe file is probably2Mleft and right
Let AI help me write an interface engine for migrating data
基于 db.json 这个数据库结构(mysql5.7),我需要你帮我写一个接口引擎,用于迁移数据到另一套系统,
所有表要插入的字段都从 diy_field 表中获取到,这个接口代码不要从db.json读取数据,而是直接从我当前数据库取数据。

1、我会给你一个 sys_menu 的Id,获取这个菜单以及它下级的所有 sys_menu 数据,形成 insert 语句
    我要准备插入新系统 sys_menu 表,sql语句中要插入的字段从 diy_field 表中获取到
2、上面第1步每个菜单的 DiyTableId 就是对应 diy_table表的一条数据,形成 insert 语句
    我要准备插入新系统 diy_table 表,sql语句中要插入的字段从 diy_field 表中获取到
3、上面第2步每条数据对应的 diy_field 表数据,要形成 insert 语句
    我我要准备插入新系统 diy_field 表,sql语句中要插入的字段从 diy_field 表中获取到
4、上面第2步每条数据的 Name 表名也要形成 create table 语句,用于创建对应的物理表,sql需要判断如果已存在则跳过
    要创建的字段从 diy_field 表中获取到
5、最终成形的所有sql语句,要带事务,我拿到另一套数据库执行,执行前要判断表是否存在,存在则跳过Give AI data
1、数据库表结构我放在了【AI-Project/microi/db.json】
2、请你先全面学习分析一下数据库结构设计,掌握表与表之间的关系,字段的含义等等
3、因为接下来我需要给你描述业务逻辑,然后让你帮我写接口引擎代码。Prefix describing business logic
*
为了防止有时出现的AI没关联到上下文,博主是每次写一个新的接口都会加上此前缀
- Let AI
学习Your experience in programming, otherwise AI generated code would be possible.不会考虑那么多
现在讲我需要实现的业务逻辑,请帮我写好相关接口引擎,请存放接口引擎的js文件到【AI-Project/microi/】下,
在写接口引擎代码之前,请先阅读我提供的注意事项:
1、假如你没理解到我说的业务逻辑,或者我描述的有问题,请不要先生成接口引擎代码,而是先跟我沟通,
	我来重新补充描述,确定没有任何疑问后再生成接口引擎代码,
	我要保证的是尽量代码一次性执行成功,而不是一直试错。
2、我描述的所有表的结构、字段名,都在db.json文件里,当你的业务逻辑在读数据、写数据时,字段名请一定要从数据库json文件中分析出正确的字段名。
3、你要考虑到性能问题,一些表的数据量可能较大,不能在大数据循环里面多次再次查询数据库,
	应该是先获取所有数据,在循环的内部从内存中获取数据做业务判断,
	假如数据量比较大,需要利用到V8.Cache来更新当前处理进度(缓存时间不过期),提供单独的进度查询接口,
	注意Cache的Key值需要以`Microi:{V8.OsClient}:`开头,防止租户缓存数据错乱。
4、V8.FormEngine不支持关联表查询,若到用到特殊的sql语句,请使用V8.Db.FromSql()
5、所有数据库操作均应该使用V8.DbTrans对象,以保证接口引擎的自动回滚或自动提交
6、请严格按照Microi吾码文档
	docs/doc/v8-engine/api-engine.md、
	docs/doc/v8-engine/v8-server.md、
	docs/doc/v8-engine/form-engine.md、
docs/doc/v8-engine/where.md 进行编写接口引擎Describe business logic 1
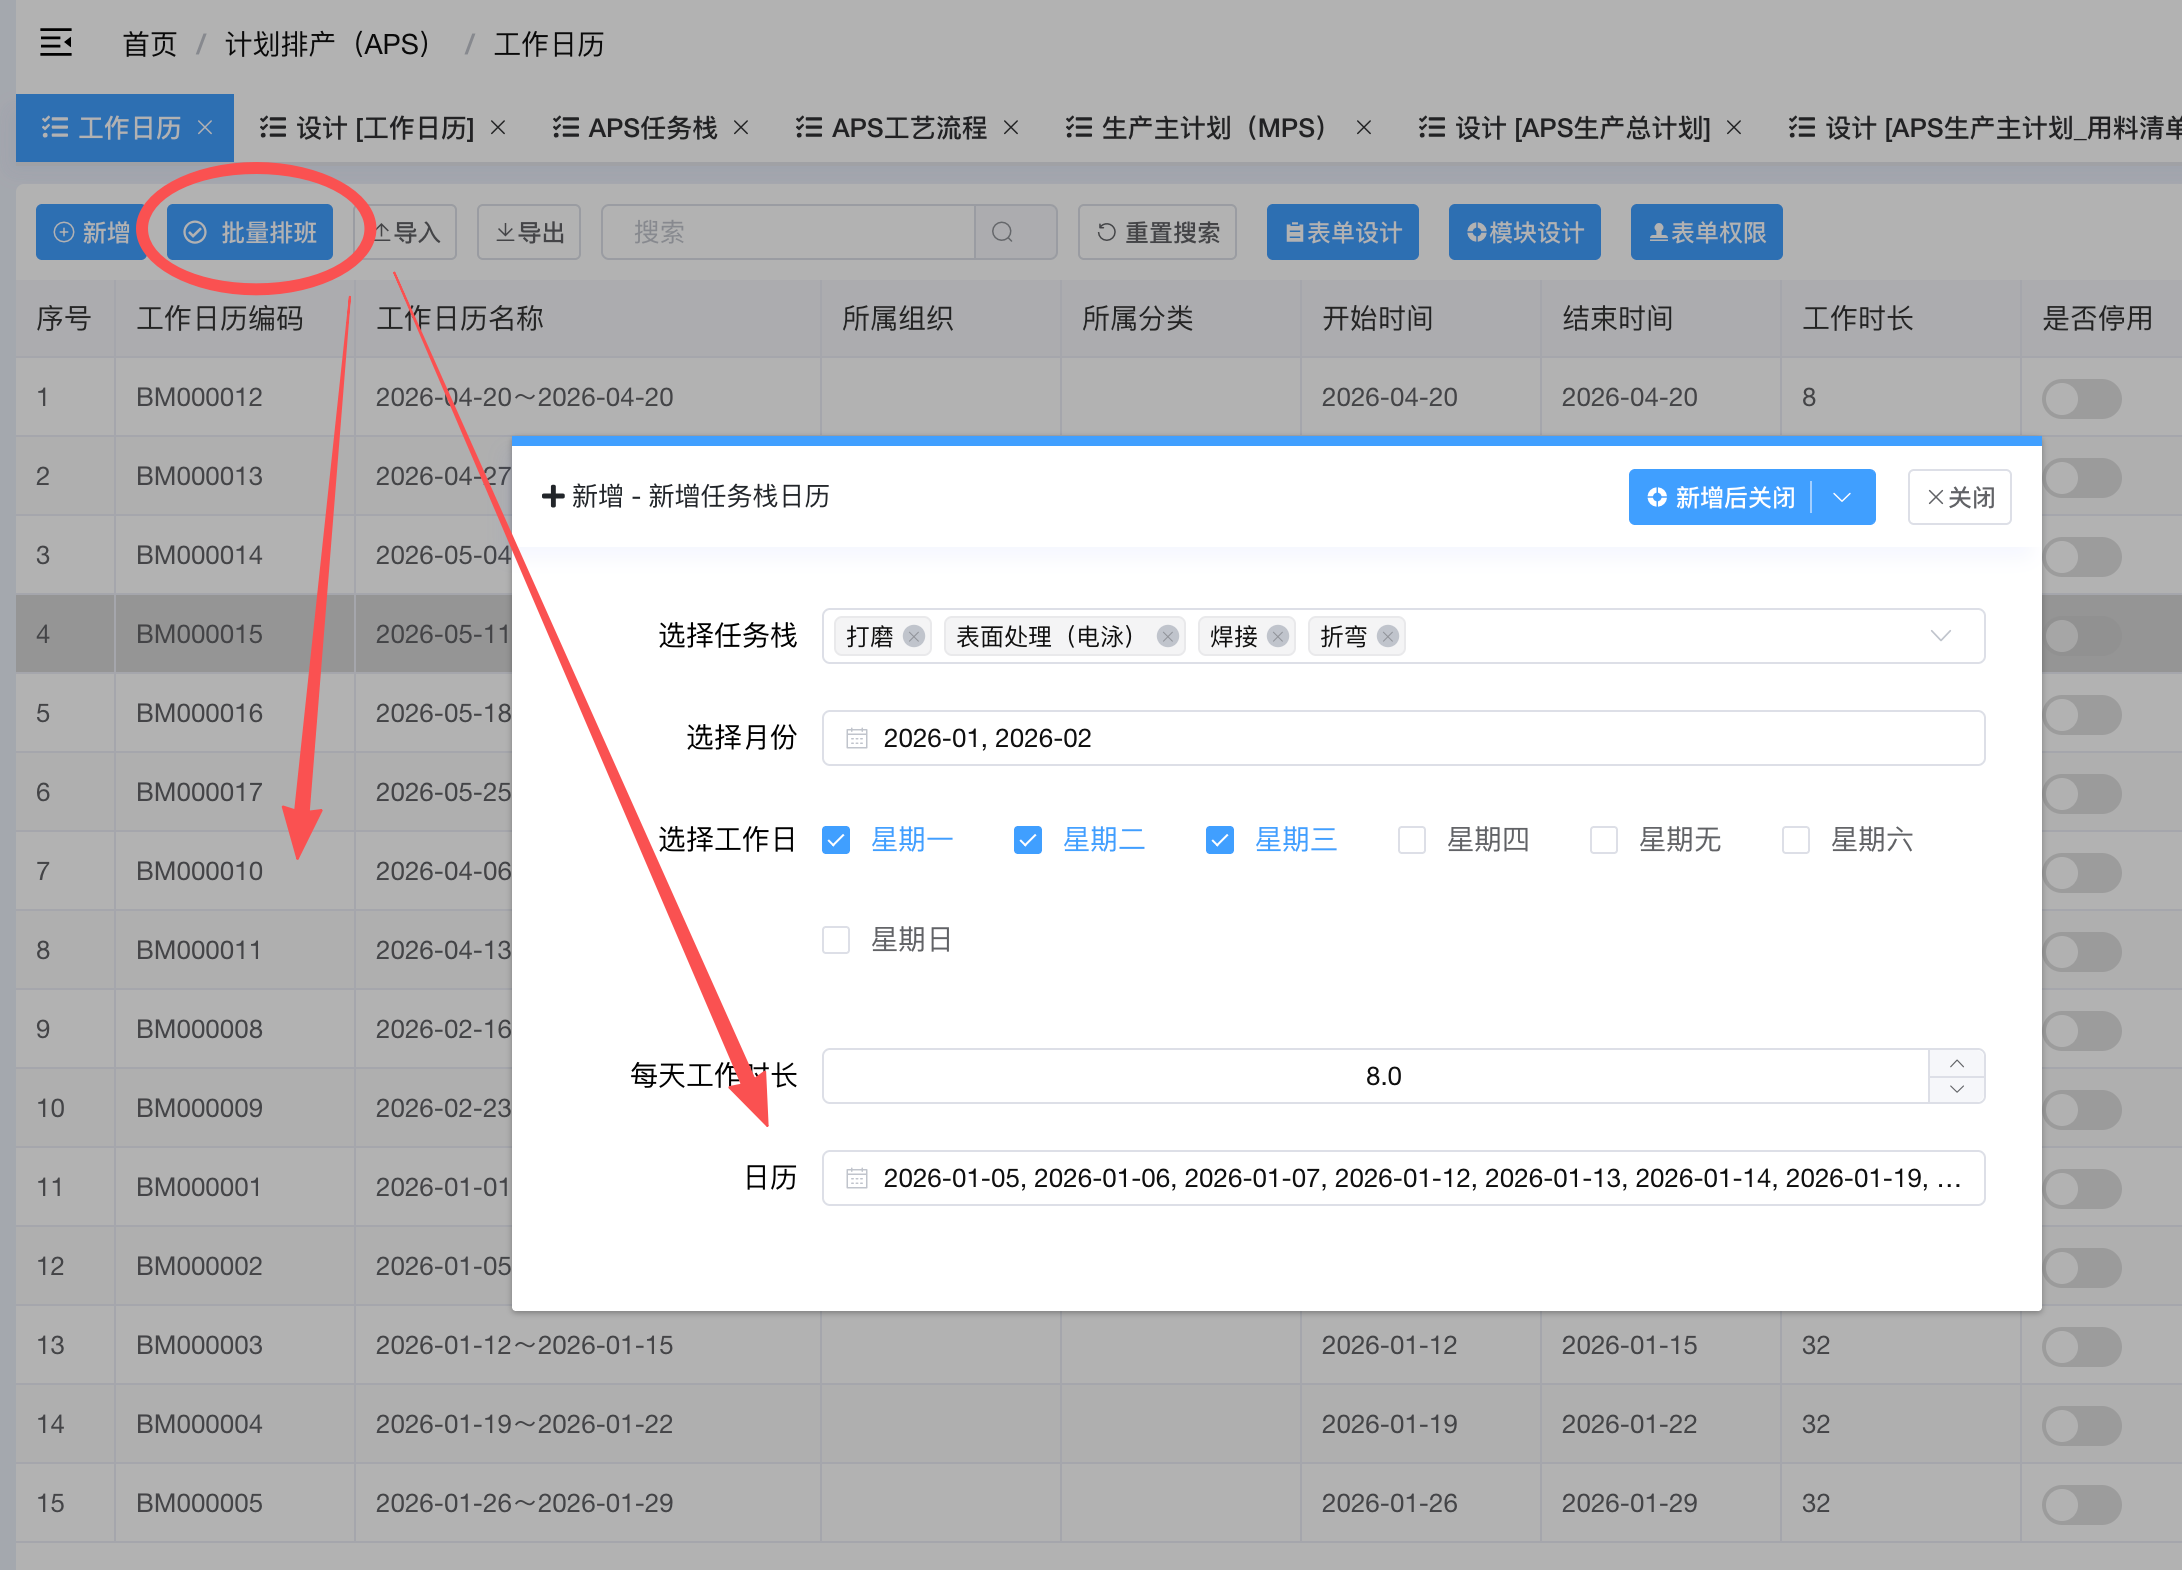
【我的需求】:
我要在菜单【计划排产(APS) - 工作日历(表diy_gzrl)】中实现【批量排班】功能,写一个接口引擎,我前端会给你传入:
1、XuanzeSCZX,选择的任务栈(表diy_APSsczx),JSON数据,数组类型
2、XuanzeGZR,选择的工作日,格式:["星期一", "星期二"],数组类型
3、XuanzeYF,选择的月份,格式['2026-02', '2026-03'],数组类型
4、MeitianGZSC,每天工作时长,类型int数字,单位小时
5、Rili,日历数据,自动根据选择的月份、工作日推算出来的所有日历数据,格式:['2026-02-02', '2026-02-03', '2026-02-04'],数组类型

然后你需要根据传入的【日历数据】,自动按月生成【diy_gzrl (工作日历) 】表数据,
1、【开始时间】为每月的每个连续时间周期的第一天,【结束时间】为每月的每个连续时间周期的最后一天,格式均为【yyyy-MM-dd】
2、【工作日历名称】生成规则为:每月的每个连续时间周期的第一天~每月的每个连续时间周期的最后一天,
3、【工作时长】=(开始时间~结束时间的天数) * 【每天工作时长】,
4、若第二次生成相同的任务栈存在相同开始时间或结束时间,则报错不让生成,检测规则为【相同任务栈 + 时间段有重叠 】
请开始分析吧!AI generated interface engine code (after about 2 or 3 conversations, the business logic description was adjusted successfully, 100% accurate)
AI-generated interface engine code
/**
 * 批量排班接口引擎
 *
 * 功能:根据选择的任务栈和日历数据,自动按月生成工作日历
 *
 * 业务逻辑:
 * 1. 接收前端传入的任务栈列表、日历数据、每天工作时长
 * 2. 将日历数据按月分组,找出每个月的连续时间周期
 * 3. 为每个任务栈的每个连续周期生成工作日历记录
 * 4. 检测时间段重叠冲突(相同任务栈 + 时间段有重叠则报错)
 * 5. 使用Redis缓存记录处理进度
 *
 * 接口配置:
 * - ApiEngineKey: batch_schedule_calendar
 * - ApiAddress: /apiengine/batch-schedule-calendar
 * - 允许匿名调用: 否
 * - 分布式锁: 是(防止并发操作)
 *
 * 前端调用示例:
 * V8.ApiEngine.Run('batch_schedule_calendar', {
 *   XuanzeSCZX: [{Id:'xxx', Name:'任务栈1', ...}],
 *   XuanzeGZR: ['星期一', '星期二'],
 *   XuanzeYF: ['2026-02', '2026-03'],
 *   MeitianGZSC: 8,
 *   Rili: ['2026-02-02', '2026-02-03', '2026-02-04', '2026-02-09']
 * })
 *
 * 返回格式:
 * {
 *   Code: 1,
 *   Data: {
 *     successCount: 5,        // 成功生成的记录数
 *     taskStackCount: 2,      // 任务栈数量
 *     periodCount: 3,         // 时间周期数量
 *     details: [...]          // 详细信息
 *   },
 *   Msg: '批量排班成功'
 * }
 */

// ==================== 参数接收与校验 ====================

var XuanzeSCZX = V8.Param.XuanzeSCZX;      // 选择的任务栈(表diy_APSsczx),JSON数组
var XuanzeGZR = V8.Param.XuanzeGZR;        // 选择的工作日,格式:["星期一", "星期二"]
var XuanzeYF = V8.Param.XuanzeYF;          // 选择的月份,格式:['2026-02', '2026-03']
var MeitianGZSC = V8.Param.MeitianGZSC;    // 每天工作时长,int数字,单位小时
var Rili = V8.Param.Rili;                  // 日历数据,格式:['2026-02-02', '2026-02-03']

// 定义调试模式和进度缓存Key
var isDebug = true;
var debugLog = {};
var progressCacheKey = 'Microi:' + V8.OsClient + ':BatchSchedule:Progress:' + V8.CurrentUser.Id;

// 参数校验
if (!XuanzeSCZX || XuanzeSCZX.length === 0) {
    return {
        Code: 0,
        Msg: '参数错误:任务栈列表不能为空'
    };
}

if (!XuanzeGZR || XuanzeGZR.length === 0) {
    return {
        Code: 0,
        Msg: '参数错误:工作日列表不能为空'
    };
}

if (!XuanzeYF || XuanzeYF.length === 0) {
    return {
        Code: 0,
        Msg: '参数错误:月份列表不能为空'
    };
}

if (!MeitianGZSC || MeitianGZSC <= 0) {
    return {
        Code: 0,
        Msg: '参数错误:每天工作时长必须大于0'
    };
}

if (!Rili || Rili.length === 0) {
    return {
        Code: 0,
        Msg: '参数错误:日历数据不能为空'
    };
}

debugLog.params = {
    taskStackCount: XuanzeSCZX.length,
    workDays: XuanzeGZR,
    selectedMonths: XuanzeYF,
    calendarDays: Rili.length,
    dailyWorkHours: MeitianGZSC
};

try {
    // ==================== 辅助函数:格式化日期时间为ISO格式 ====================
    var formatDateTime = function(date) {
        var year = date.getFullYear();
        var month = date.getMonth() + 1;
        var day = date.getDate();
        var hours = date.getHours();
        var minutes = date.getMinutes();
        var seconds = date.getSeconds();

        var monthStr = month < 10 ? '0' + month : '' + month;
        var dayStr = day < 10 ? '0' + day : '' + day;
        var hoursStr = hours < 10 ? '0' + hours : '' + hours;
        var minutesStr = minutes < 10 ? '0' + minutes : '' + minutes;
        var secondsStr = seconds < 10 ? '0' + seconds : '' + seconds;

        return year + '-' + monthStr + '-' + dayStr + ' ' + hoursStr + ':' + minutesStr + ':' + secondsStr;
    };

    // ==================== 初始化进度 ====================
    V8.Cache.Set(progressCacheKey, JSON.stringify({
        status: 'processing',
        step: '开始处理',
        progress: 0,
        total: 0,
        startTime: formatDateTime(new Date())
    }));

    // ==================== 辅助函数:日期排序 ====================
    var sortDates = function(dates) {
        return dates.sort(function(a, b) {
            return new Date(a) - new Date(b);
        });
    };

    // ==================== 辅助函数:计算两个日期相差天数 ====================
    var getDaysDiff = function(date1, date2) {
        var d1 = new Date(date1);
        var d2 = new Date(date2);
        var diffTime = Math.abs(d2 - d1);
        return Math.ceil(diffTime / (1000 * 60 * 60 * 24));
    };

    // ==================== 辅助函数:日期加1天 ====================
    var addOneDay = function(dateStr) {
        var date = new Date(dateStr);
        date.setDate(date.getDate() + 1);
        var year = date.getFullYear();
        var month = date.getMonth() + 1;
        var day = date.getDate();
        // 使用传统方式补零
        var monthStr = month < 10 ? '0' + month : '' + month;
        var dayStr = day < 10 ? '0' + day : '' + day;
        return year + '-' + monthStr + '-' + dayStr;
    };

    // ==================== 步骤1:按月分组日历数据 ====================
    V8.Cache.Set(progressCacheKey, JSON.stringify({
        status: 'processing',
        step: '按月分组日历数据',
        progress: 10,
        total: 100
    }));

    var sortedDates = sortDates(Rili);
    var monthGroups = {}; // { '2026-02': ['2026-02-02', '2026-02-03', ...] }

    for (var i = 0; i < sortedDates.length; i++) {
        var dateStr = sortedDates[i];
        var monthKey = dateStr.substring(0, 7); // 取 yyyy-MM
        if (!monthGroups[monthKey]) {
            monthGroups[monthKey] = [];
        }
        monthGroups[monthKey].push(dateStr);
    }

    debugLog.monthGroups = monthGroups;

    // ==================== 步骤2:找出每个月的连续时间周期 ====================
    V8.Cache.Set(progressCacheKey, JSON.stringify({
        status: 'processing',
        step: '识别连续时间周期',
        progress: 20,
        total: 100
    }));

    var allPeriods = []; // 存储所有时间周期 [{month, startDate, endDate, days}]

    for (var monthKey in monthGroups) {
        var dates = monthGroups[monthKey];
        var periods = [];

        if (dates.length === 0) continue;

        var periodStart = dates[0];
        var periodEnd = dates[0];

        for (var j = 1; j < dates.length; j++) {
            var prevDate = dates[j - 1];
            var currDate = dates[j];

            // 计算日期差,判断是否连续
            var expectedNextDate = addOneDay(prevDate);

            if (currDate === expectedNextDate) {
                // 连续,扩展当前周期
                periodEnd = currDate;
            } else {
                // 不连续,保存当前周期,开始新周期
                var days = getDaysDiff(periodStart, periodEnd) + 1;
                periods.push({
                    month: monthKey,
                    startDate: periodStart,
                    endDate: periodEnd,
                    days: days
                });

                periodStart = currDate;
                periodEnd = currDate;
            }
        }

        // 保存最后一个周期
        var days = getDaysDiff(periodStart, periodEnd) + 1;
        periods.push({
            month: monthKey,
            startDate: periodStart,
            endDate: periodEnd,
            days: days
        });

        allPeriods = allPeriods.concat(periods);
    }

    debugLog.periods = allPeriods;
    debugLog.periodCount = allPeriods.length;

    if (allPeriods.length === 0) {
        return {
            Code: 0,
            Msg: '没有找到有效的连续时间周期',
            DataAppend: {
                DebugLog: isDebug ? debugLog : null
            }
        };
    }

    // ==================== 步骤3:为每个任务栈检测冲突并生成工作日历 ====================
    V8.Cache.Set(progressCacheKey, JSON.stringify({
        status: 'processing',
        step: '检测冲突并生成工作日历',
        progress: 30,
        total: 100
    }));

    var successCount = 0;
    var totalOperations = allPeriods.length;
    var currentOperation = 0;
    var generatedRecords = [];

    // 将整个任务栈数组JSON化
    var allTaskStackJson = JSON.stringify(XuanzeSCZX);

    // 查询已存在的工作日历(用于冲突检测)
    var existingCalendars = V8.FormEngine.GetTableData('diy_gzrl', {
        _Where: [],
        _PageSize: 1000
    });

    if (existingCalendars.Code != 1) {
        return {
            Code: 0,
            Msg: '查询已存在的工作日历失败:' + existingCalendars.Msg,
            DataAppend: {
                DebugLog: isDebug ? debugLog : null
            }
        };
    }

    var existingPeriods = existingCalendars.Data || [];
    debugLog.existingCount = existingPeriods.length;

    // 遍历每个时间周期
    for (var periodIdx = 0; periodIdx < allPeriods.length; periodIdx++) {
        var period = allPeriods[periodIdx];
        currentOperation++;

        // 更新进度
        var progress = 30 + Math.floor((currentOperation / totalOperations) * 60);
        V8.Cache.Set(progressCacheKey, JSON.stringify({
            status: 'processing',
            step: '处理周期 ' + (periodIdx + 1) + '/' + allPeriods.length,
            progress: progress,
            total: 100,
            currentPeriod: period.startDate + '~' + period.endDate
        }));

        // ==================== 冲突检测:时间段重叠 ====================
        var hasConflict = false;
        var conflictPeriod = null;

        for (var k = 0; k < existingPeriods.length; k++) {
            var existing = existingPeriods[k];
            var existingStart = existing.StartTime;
            var existingEnd = existing.EndTime;

            // 判断时间段是否重叠
            // 重叠条件:新周期开始 <= 已存在周期结束 AND 新周期结束 >= 已存在周期开始
            if (period.startDate <= existingEnd && period.endDate >= existingStart) {
                hasConflict = true;
                conflictPeriod = {
                    existing: existingStart + '~' + existingEnd,
                    new: period.startDate + '~' + period.endDate
                };
                break;
            }
        }

        if (hasConflict) {
            // 清理进度缓存
            V8.Cache.Remove(progressCacheKey);

            return {
                Code: 0,
                Msg: '时间段【' + period.startDate + '~' + period.endDate + '】存在重叠冲突',
                DataAppend: {
                    conflict: conflictPeriod,
                    DebugLog: isDebug ? debugLog : null
                }
            };
        }

        // ==================== 生成工作日历记录 ====================
        var gongzuoRLMC = period.startDate + '~' + period.endDate;
        var shezhiGS = period.days * MeitianGZSC;

        var addResult = V8.FormEngine.AddFormData('diy_gzrl', {
            Code: '',  // 空字符串,使用自动编号
            Name: gongzuoRLMC,
            RenwuZ: allTaskStackJson,  // 存储整个任务栈数组JSON
            StartTime: period.startDate,
            EndTime: period.endDate,
            ShezhiGS: shezhiGS
        }, V8.DbTrans);

        if (addResult.Code != 1) {
            // 清理进度缓存
            V8.Cache.Remove(progressCacheKey);

            return {
                Code: 0,
                Msg: '生成工作日历失败:' + addResult.Msg,
                DataAppend: {
                    period: period,
                    DebugLog: isDebug ? debugLog : null
                }
            };
        }

        successCount++;
        generatedRecords.push({
            period: gongzuoRLMC,
            days: period.days,
            workHours: shezhiGS,
            recordId: addResult.Data.Id
        });
    }

    // ==================== 步骤4:完成处理 ====================
    V8.Cache.Set(progressCacheKey, JSON.stringify({
        status: 'completed',
        step: '批量排班完成',
        progress: 100,
        total: 100,
        successCount: successCount,
        endTime: formatDateTime(new Date())
    }));

    debugLog.summary = {
        successCount: successCount,
        taskStackCount: XuanzeSCZX.length,
        periodCount: allPeriods.length,
        totalOperations: totalOperations
    };

    // ==================== 返回结果 ====================
    // 计算总工时(使用for循环代替reduce)
    var totalWorkHours = 0;
    for (var m = 0; m < generatedRecords.length; m++) {
        totalWorkHours += generatedRecords[m].workHours;
    }

    return {
        Code: 1,
        Data: {
            successCount: successCount,
            taskStackCount: XuanzeSCZX.length,
            periodCount: allPeriods.length,
            totalWorkHours: totalWorkHours,
            details: generatedRecords
        },
        Msg: '批量排班成功!共为 ' + XuanzeSCZX.length + ' 个任务栈生成 ' + successCount + ' 条工作日历记录',
        DataAppend: {
            DebugLog: isDebug ? debugLog : null
        }
    };

} catch (error) {
    // 清理进度缓存
    V8.Cache.Remove(progressCacheKey);

    // 收集详细的错误信息
    debugLog.errorDetails = {
        message: error.message || '',
        toString: error.toString ? error.toString() : '',
        stack: error.stack || '',
        lineNumber: error.lineNumber || '',
        columnNumber: error.columnNumber || '',
        fileName: error.fileName || '',
        name: error.name || '',
        description: error.description || ''
    };

    var errorMsg = '批量排班发生异常:' + (error.message || error.toString());
    if (error.lineNumber) {
        errorMsg += ' (行号: ' + error.lineNumber + ')';
    }
    if (error.stack) {
        errorMsg += '\n堆栈: ' + error.stack;
    }

    return {
        Code: 0,
        Msg: errorMsg,
        DataAppend: {
            DebugLog: isDebug ? debugLog : null
        }
    };
}
Describe business logic 2
Expand View Code (41 lines)
【我的需求】:
1、首先你要知道这几张表结构:
	【生产主计划】:【diy_scxqdd1766715873794 (APS生产总计划)】
		子表【生产主计划-任务栈列表】:【diy_APSgylxsczx1766717760801 (APS生产主计划-任务栈列表) 】,
			子表的RequirementOrderId字段与主表Id关联,我已经增加了【生产主计划-任务栈列表】的【RequirementOrderId】字段,
			你的数据库json文件中可能没有,你现在认为有。
		子表【生产主计划-用料清单】:【diy_materialInput17666524183101766720999968 (APS生产主计划_用料清单) 】,
			子表RequirementOrderId与主表Id关联。

	【生产需求订单】:【diy_scxqdd (生产需求订单)】
		子表【生产需求订单-生产物料清单】:【diy_scwlqd (生产物料清单)】,子表RequirementOrderId与主表Id关联

	【存货档案】:【diy_chda_new (存货档案)】

	【APS工艺流程】:【diy_gylx1766652316974 (APS工艺路线) 】
		子表【APS工艺流程-任务栈列表】:【diy_APSgylxsczx (APS工艺路线-任务栈列表) 】,子表GongyiLCID与主表Id关联

	【生产主计划】与【生产需求订单】通过两边的【XuqiuDDH】字段进行1对1关联

	【生产主计划】与【APS工艺流程】通过两边的【CunhuoBM】字段进行1对1关联,关联查询时只取【APS工艺流程】【ShifouTY <> 1】的数据

2、我要在【生产主计划】实现【引入】功能,写一个接口引擎
3、数据来源于【生产需求订单】的数据,条件是
	2.1、未派工数(WeipaiCS)>0
	2.2、物料编码分类='成品',注意【生产需求订单】只有【物料编码CunhuoBM】,没有【物料编码分类】,
	这里应该要使用到left join查询【存货档案】中的【存货编码CunhuoBM】等于【生产需求订单】的【物料编码】查询出【存货档案】中的【物料分组 WuliaoFZ】='产成品'。
	2.3、ERP是否关闭(ShifouGB)=0
	2.4、被合并的需求订单不进来(HebingID字段为空字符串或null才同步)
4、然后插入进来,如果已存在(根据两张表同一个生产订单号XuqiuDDH字段匹配),若与【生产需求订单】的【未派工数(WeipaiCS)】不一样,以则执行修改,否则跳过。
5、在插入之前,需要通过V8.Cache判断当前是否正在引入(缓存时间不过期,代码报错立即过期),是的话则返回当前正在引入的错误!
6、在插入之前,首先要全量更新【生产主计划】的【未派工数WeipaiCS】,根据【生产需求订单】的【XuqiuDDH】=【生产主计划】的【XuqiuDDH】
7、同时还要插入【生产主计划-任务栈列表】,插入逻辑是:
	7.1、根据【生产主计划】的【产成品编码CunhuoBM】=【APS工艺流程】的【产成品编码CunhuoBM】,查询到【APS工艺流程】数据,
	再取【APS工艺流程-任务栈列表】的数据,全部复制进【生产主计划-任务栈列表】
8、同时还要插入【生产主计划-用料清单】,查询到对应的【生产需求订单】的子表【生产需求订单-生产物料清单】数据,全部插入到【生产主计划-用料清单】中,用于后面计算齐套数。
9、从A表获取的数据要插入到B表的时候,若碰到不相同的字段,则在代码中写好每个字段一行的注释标记,我会来手工处理,两边的字段名、字段说明都要写到注释。
	碰到不确定的字段,默认值为null即可。
10、不需要分批处理,一次性处理完所有数据,因为有Redis进度可查看。
11、插入新数据时,新数据的Id值均不用指定,平台会默认生成。

请开始分析吧!AI generated interface engine code (blogger encountered a problem and AI lost context)
*
解决方案Yes新开一个会话, re-start the conversation to arrive at the correct interface engine code for this business logic.
- It is strongly recommended that complex business logic, 'open a new session for each interface', because AI learn very fast and can learn my code MD document in a few seconds.
AI-generated interface engine code
/**
* 生产主计划引入接口引擎
*
* 功能:从【生产需求订单】批量引入数据到【APS生产总计划】
*
* 业务逻辑:
* 1. 检查Redis缓存,防止重复引入(并发控制)
* 2. 全量更新【生产主计划】的未派工数(从【生产需求订单】同步)
* 3. 查询符合条件的【生产需求订单】:
* - 未派工数 > 0
* - 物料编码分类 = '成品'(通过存货档案关联)
* - ERP是否关闭 = 0
* - 合并ID为空
* 4. 根据生产订单号判断是否已存在:
* - 已存在且未派工数不同:更新
* - 不存在:插入
* 5. 插入【任务栈列表】子表(从【APS工艺路线-任务栈列表】复制)
* 6. 插入【用料清单】子表(从【生产需求订单-生产物料清单】复制)
* 7. 使用Redis缓存记录处理进度
*
* 接口配置:
* - ApiEngineKey: import_production_plan
* - ApiAddress: /apiengine/import-production-plan
* - 允许匿名调用: 否
* - 分布式锁: 是(防止并发操作)
*
* 前端调用示例:
* V8.ApiEngine.Run('import_production_plan', {})
*
* 返回格式:
* {
* Code: 1,
* Data: {
* insertCount: 10, // 新增记录数
* updateCount: 5, // 更新记录数
* skipCount: 3, // 跳过记录数
* taskStackCount: 15, // 任务栈记录数
* materialCount: 50 // 用料清单记录数
* },
* Msg: '引入成功'
* }
*/
// ==================== 参数接收与校验 ====================
// 定义调试模式和进度缓存Key
var isDebug = true;
var debugLog = {};
var progressCacheKey = 'Microi:' + V8.OsClient + ':ImportProductionPlan:Progress:' + V8.CurrentUser.Id;
var lockCacheKey = 'Microi:' + V8.OsClient + ':ImportProductionPlan:Lock';
try {
// ==================== 辅助函数:格式化日期时间为ISO格式 ====================
var formatDateTime = function(date) {
var year = date.getFullYear();
var month = date.getMonth() + 1;
var day = date.getDate();
var hours = date.getHours();
var minutes = date.getMinutes();
var seconds = date.getSeconds();
var monthStr = month < 10 ? '0' + month : '' + month;
var dayStr = day < 10 ? '0' + day : '' + day;
var hoursStr = hours < 10 ? '0' + hours : '' + hours;
var minutesStr = minutes < 10 ? '0' + minutes : '' + minutes;
var secondsStr = seconds < 10 ? '0' + seconds : '' + seconds;
return year + '-' + monthStr + '-' + dayStr + ' ' + hoursStr + ':' + minutesStr + ':' + secondsStr;
};
// ==================== 步骤1:检查是否正在引入(并发控制) ====================
var lockCache = V8.Cache.Get(lockCacheKey);
if (lockCache) {
return {
Code: 0,
Msg: '当前正在执行引入操作,请稍后再试!您可以通过进度查询接口查看当前进度。'
};
}
// 设置锁标记(10分钟有效期,防止异常情况下锁一直存在)
V8.Cache.Set(lockCacheKey, 'locked');//, '0.00:10:00'
// 初始化进度
V8.Cache.Set(progressCacheKey, JSON.stringify({
status: 'processing',
step: '开始引入',
progress: 0,
total: 100,
startTime: formatDateTime(new Date())
}));
debugLog.startTime = formatDateTime(new Date());
// ==================== 步骤2:全量更新【生产主计划】的未派工数 ====================
V8.Cache.Set(progressCacheKey, JSON.stringify({
status: 'processing',
step: '全量更新未派工数',
progress: 5,
total: 100
}));
var updateWeipaiSql =
"UPDATE diy_scxqdd1766715873794 AS main " +
"INNER JOIN diy_scxqdd AS req ON main.XuqiuDDH = req.XuqiuDDH " +
"SET main.WeipaiCS = req.WeipaiCS " +
"WHERE req.WeipaiCS IS NOT NULL";
var updateCount = V8.DbTrans.FromSql(updateWeipaiSql).ExecuteNonQuery();
debugLog.updateWeipaiCount = updateCount;
// ==================== 步骤3:查询符合条件的【生产需求订单】 ====================
V8.Cache.Set(progressCacheKey, JSON.stringify({
status: 'processing',
step: '查询符合条件的生产需求订单',
progress: 10,
total: 100
}));
// 查询条件:
// 1. WeipaiCS > 0
// 2. stock_type = '成品' (通过存货档案关联)
// 3. ShifouGB = 0
// 4. HebingID IS NULL or HebingID = ''
var querySql =
"SELECT req.* " +
"FROM diy_scxqdd AS req " +
"LEFT JOIN diy_chda_new AS stock ON req.CunhuoBM = stock.CunhuoBM " +
"WHERE req.WeipaiCS > 0 " +
"AND stock.stock_type = '成品' " +
"AND req.ShifouGB = 0 " +
"AND (req.HebingID IS NULL OR req.HebingID = '')";
var requirementOrders = V8.DbTrans.FromSql(querySql).ToArray();
if (!requirementOrders || requirementOrders.length === 0) {
// 清理锁
V8.Cache.Remove(lockCacheKey);
V8.Cache.Set(progressCacheKey, JSON.stringify({
status: 'completed',
step: '没有符合条件的数据',
progress: 100,
total: 100
}));
return {
Code: 0,
Data: {
insertCount: 0,
updateCount: 0,
skipCount: 0
},
Msg: '没有符合条件的生产需求订单需要引入',
DataAppend: {
DebugLog: isDebug ? debugLog : null
}
};
}
debugLog.requirementOrderCount = requirementOrders.length;
// ==================== 步骤4:查询已存在的【生产主计划】记录 ====================
V8.Cache.Set(progressCacheKey, JSON.stringify({
status: 'processing',
step: '查询已存在的生产主计划',
progress: 15,
total: 100
}));
var existingPlans = V8.FormEngine.GetTableData('diy_scxqdd1766715873794', {
_Where: [],
_PageSize: 10000,
_SelectFields: ['Id', 'XuqiuDDH', 'WeipaiCS']
}, V8.DbTrans);
if (existingPlans.Code != 1) {
V8.Cache.Remove(lockCacheKey);
return {
Code: 0,
Msg: '查询已存在的生产主计划失败:' + existingPlans.Msg,
DataAppend: {
DebugLog: isDebug ? debugLog : null
}
};
}
// 构建已存在记录的映射(Key: XuqiuDDH, Value: {Id, WeipaiCS})
var existingPlanMap = {};
var existingPlanList = existingPlans.Data || [];
for (var i = 0; i < existingPlanList.length; i++) {
var plan = existingPlanList[i];
existingPlanMap[plan.XuqiuDDH] = {
Id: plan.Id,
WeipaiCS: plan.WeipaiCS
};
}
debugLog.existingPlanCount = existingPlanList.length;
// ==================== 步骤5:批量插入/更新主表记录 ====================
V8.Cache.Set(progressCacheKey, JSON.stringify({
status: 'processing',
step: '处理主表数据',
progress: 20,
total: 100
}));
var insertList = [];
var updateList = [];
var skipList = [];
var newPlanIds = []; // 存储新插入记录的订单号,用于后续插入子表
for (var i = 0; i < requirementOrders.length; i++) {
var order = requirementOrders[i];
var existingPlan = existingPlanMap[order.XuqiuDDH];
if (existingPlan) {
// 已存在,判断是否需要更新
if (existingPlan.WeipaiCS != order.WeipaiCS) {
updateList.push({
FormEngineKey: 'diy_scxqdd1766715873794',
Id: existingPlan.Id,
// 【生产需求订单】-> 【APS生产总计划】字段映射
WeipaiCS: order.WeipaiCS, // 未派工数 -> 未派工数
XuqiuDDH: order.XuqiuDDH, // 订单号 -> 生产订单号
ERPxqddh: order.ERPxqddh, // ERP订单号 -> ERP生产订单号
XuQiuDJ: order.XuQiuDJ, // 需求单据 -> 需求单据
ShengchanLX: order.ShengchanLX, // 生产类型 -> 生产类型
ShengchanBMID: order.ShengchanBMID, // ShengchanBMID -> ShengchanBMID
PaichanZT: order.PaichanZT, // 排产状态 -> 排产状态
ShifouGB: order.ShifouGB, // ERP是否关闭 -> ERP是否关闭
ShiyongZZBM: order.ShiyongZZBM, // 使用组织编码 -> 使用组织编码
ShengchanYLQDFLNM: order.ShengchanYLQDFLNM, // 生产用料清单分录内码 -> 生产用料清单分录内码
CunhuoBM: order.CunhuoBM, // 物料编码 -> 产成品编码
Cunhuo: order.Cunhuo, // 存货 -> 产成品
CunhuoID: order.CunhuoID, // CunhuoID -> CunhuoID
KehuMC: order.KehuMC, // 客户名称 -> 客户名称
XiaoshouDDID: order.XiaoshouDDID, // 销售订单Id -> 销售订单Id
Beizhu: order.Beizhu // 备注 -> 备注
});
} else {
skipList.push(order.XuqiuDDH);
}
} else {
// 不存在,插入新记录
insertList.push({
FormEngineKey: 'diy_scxqdd1766715873794',
// 【生产需求订单】-> 【APS生产总计划】字段映射
XuqiuDDH: order.XuqiuDDH, // 订单号 -> 生产订单号
ERPxqddh: order.ERPxqddh, // ERP订单号 -> ERP生产订单号
Cunhuo: order.Cunhuo, // 存货 -> 产成品
CunhuoBM: order.CunhuoBM, // 物料编码 -> 产成品编码
CunhuoID: order.CunhuoID, // CunhuoID -> CunhuoID
// 注意:以下字段在【生产需求订单】中不存在,从关联表或默认值获取
// CunhuoMC: null, // 产成品名称(从存货档案获取)
// GuigeXH: null, // 规格型号(从存货档案获取)
Kehu: null, // 客户(生产需求订单无此字段)
// KehuBM: null, // 客户编码(生产需求订单无此字段)
KehuMC: order.KehuMC, // 客户名称 -> 客户名称
KehuID: null, // 客户ID(生产需求订单无此字段)
ShengchanLX: order.ShengchanLX, // 生产类型 -> 生产类型
ShengchanBM: null, // 生产部门(生产需求订单无此字段)
ShengchanBMID: order.ShengchanBMID, // ShengchanBMID -> ShengchanBMID
PaichanKSSJ: null, // 排产开始时间(默认空)
PaichanJSSJ: null, // 排产结束时间(默认空)
PaichanZT: order.PaichanZT, // 排产状态 -> 排产状态
ZhoujiHZT: null, // 周计划状态(默认空)
QitaoS: 0, // 齐套数(默认0)
WeipaiCS: order.WeipaiCS, // 未派工数 -> 未派工数
XiugaiXSCN: null, // 修改小时产能(默认空)
XiugaiKSSJ: null, // 修改开始时间(默认空)
XiugaiJSSJ: null, // 修改结束时间(默认空)
XuQiuDJ: order.XuQiuDJ, // 需求单据 -> 需求单据
ShifouGB: order.ShifouGB, // ERP是否关闭 -> ERP是否关闭
priority: 0, // 优先级(默认0)
HebingID: null, // 合并Id(默认空)
ShengchanYLQDFLNM: order.ShengchanYLQDFLNM, // 生产用料清单分录内码 -> 生产用料清单分录内码
// XuqiuLY: null, // 需求来源(生产需求订单无此字段)
// KehuHTH: null, // 客户合同号(生产需求订单无此字段)
XiaoshouDDID: order.XiaoshouDDID, // 销售订单Id -> 销售订单Id
// ShiyongZZ: null, // 使用组织(生产需求订单无此字段)
// XuqiuLX: null, // 需求类型(生产需求订单无此字段)
ShiyongZZBM: order.ShiyongZZBM, // 使用组织编码 -> 使用组织编码
PaichanS: null, // 排产数(默认空)
due_date: null, // 订单交付时间(默认空)
Beizhu: order.Beizhu, // 备注 -> 备注
YaoqiuQTSJ: null, // 要求齐套时间(默认空)
DingdanSL: null, // 订单数量(默认空)
JiliangDW: null, // 计量单位(默认空)
XiugaiQTYQSJ: null // 修改齐套要求时间(默认空)
});
newPlanIds.push(order.XuqiuDDH);
}
// 更新进度
if (i % 10 === 0) {
var progress = 20 + Math.floor((i / requirementOrders.length) * 20);
V8.Cache.Set(progressCacheKey, JSON.stringify({
status: 'processing',
step: '处理主表数据 (' + (i + 1) + '/' + requirementOrders.length + ')',
progress: progress,
total: 100
}));
}
}
debugLog.insertListCount = insertList.length;
debugLog.updateListCount = updateList.length;
debugLog.skipListCount = skipList.length;
// 执行批量插入
var insertResult = null;
if (insertList.length > 0) {
V8.Cache.Set(progressCacheKey, JSON.stringify({
status: 'processing',
step: '批量插入新记录',
progress: 40,
total: 100
}));
insertResult = V8.FormEngine.AddTableData(insertList, V8.DbTrans);
if (insertResult.Code != 1) {
V8.Cache.Remove(lockCacheKey);
return {
Code: 0,
Msg: '批量插入生产主计划失败:' + insertResult.Msg,
DataAppend: {
DebugLog: isDebug ? debugLog : null
}
};
}
}
// 执行批量更新
var updateResult = null;
if (updateList.length > 0) {
V8.Cache.Set(progressCacheKey, JSON.stringify({
status: 'processing',
step: '批量更新已存在记录',
progress: 45,
total: 100
}));
updateResult = V8.FormEngine.UptTableData(updateList, V8.DbTrans);
if (updateResult.Code != 1) {
V8.Cache.Remove(lockCacheKey);
return {
Code: 0,
Msg: '批量更新生产主计划失败:' + updateResult.Msg,
DataAppend: {
DebugLog: isDebug ? debugLog : null
}
};
}
}
// ==================== 步骤6:查询并插入【任务栈列表】子表 ====================
V8.Cache.Set(progressCacheKey, JSON.stringify({
status: 'processing',
step: '查询APS工艺路线',
progress: 50,
total: 100
}));
// 查询所有新插入的【生产主计划】记录(需要获取Id)
var newPlanRecords = V8.FormEngine.GetTableData('diy_scxqdd1766715873794', {
_Where: [
['XuqiuDDH', 'In', newPlanIds]
],
_PageSize: 10000,
_SelectFields: ['Id', 'XuqiuDDH', 'CunhuoBM']
}, V8.DbTrans);
if (newPlanRecords.Code != 1) {
V8.Cache.Remove(lockCacheKey);
return {
Code: 0,
Msg: '查询新插入的生产主计划记录失败:' + newPlanRecords.Msg,
DataAppend: {
DebugLog: isDebug ? debugLog : null
}
};
}
var newPlanList = newPlanRecords.Data || [];
var taskStackInsertCount = 0;
var materialInsertCount = 0;
var noGongyiCount = 0; // 没有找到工艺路线的记录数
for (var i = 0; i < newPlanList.length; i++) {
var planRecord = newPlanList[i];
// 更新进度
if (i % 5 === 0) {
var progress = 50 + Math.floor((i / newPlanList.length) * 40);
V8.Cache.Set(progressCacheKey, JSON.stringify({
status: 'processing',
step: '插入子表数据 (' + (i + 1) + '/' + newPlanList.length + ')',
progress: progress,
total: 100
}));
}
// 查询【APS工艺路线】(优先取ShifouMR=1,否则取第一条,且ShifouTY<>1)
var gongyiQuery = V8.FormEngine.GetTableData('diy_gylx1766652316974', {
_Where: [
['CunhuoBM', '=', planRecord.CunhuoBM],
['ShifouTY', '<>', 1]
],
_OrderBy: 'ShifouMR',
_OrderByType: 'DESC',
_PageSize: 1
}, V8.DbTrans);
if (gongyiQuery.Code != 1 || !gongyiQuery.Data || gongyiQuery.Data.length === 0) {
// 没有找到工艺路线,记录日志,继续处理下一条
noGongyiCount++;
if (!debugLog.noGongyiRecords) {
debugLog.noGongyiRecords = [];
}
debugLog.noGongyiRecords.push({
XuqiuDDH: planRecord.XuqiuDDH,
CunhuoBM: planRecord.CunhuoBM
});
continue;
}
var gongyiRecord = gongyiQuery.Data[0];
// 查询【APS工艺路线-任务栈列表】
var taskStackQuery = V8.FormEngine.GetTableData('diy_APSgylxsczx', {
_Where: [
['GongyiLCID', '=', gongyiRecord.Id]
],
_PageSize: 1000
}, V8.DbTrans);
if (taskStackQuery.Code != 1) {
V8.Cache.Remove(lockCacheKey);
return {
Code: 0,
Msg: '查询APS工艺路线-任务栈列表失败:' + taskStackQuery.Msg,
DataAppend: {
DebugLog: isDebug ? debugLog : null
}
};
}
var taskStackList = taskStackQuery.Data || [];
// 复制任务栈列表到【APS生产主计划-任务栈列表】
var taskStackInsertList = [];
for (var j = 0; j < taskStackList.length; j++) {
var sourceTask = taskStackList[j];
taskStackInsertList.push({
FormEngineKey: 'diy_APSgylxsczx1766717760801',
RequirementOrderId: planRecord.Id, // 关联到生产主计划Id
// ========== 字段名和说明完全相同的字段(直接复制) ==========
ShifouMD: sourceTask.ShifouMD, // 是否末道 -> 是否末道
XiaoshiCN: sourceTask.XiaoshiCN, // 小时产能 -> 小时产能
// GongxuLB: sourceTask.GongxuLB, // 产线列表 -> 产线列表(子表的子表,暂不处理)
QianzhiTS: sourceTask.QianzhiTS, // 前置天数 -> 前置天数
XiadaoRWZ: sourceTask.XiadaoRWZ, // 下道任务栈 -> 下道任务栈
SuoshuZZ: sourceTask.SuoshuZZ, // 所属组织 -> 所属组织
// YongliaoQD: sourceTask.YongliaoQD, // 用料清单 -> 用料清单(子表的子表,暂不处理)
RenwuZLX: sourceTask.RenwuZLX, // 任务栈类型 -> 任务栈类型
ShengchanZXBM: sourceTask.ShengchanZXBM, // 任务栈编码 -> 任务栈编码
Fujian: sourceTask.Fujian, // 附件 -> 附件
PaixuM: sourceTask.PaixuM, // 排序码 -> 排序码
ShifouTY: sourceTask.ShifouTY, // 是否停用 -> 是否停用
SuoshuBM: sourceTask.SuoshuBM, // 所属部门 -> 所属部门
ShengchanXS: sourceTask.ShengchanXS, // 生产系数 -> 生产系数
JiaoqiFDBL: sourceTask.JiaoqiFDBL, // 交期放大比例 -> 交期放大比例
DiejiaTS: sourceTask.DiejiaTS, // 叠加天数 -> 叠加天数
ShengchanZXMC: sourceTask.ShengchanZXMC, // 任务栈名称 -> 任务栈名称
ShifouSD: sourceTask.ShifouSD, // 是否首道 -> 是否首道
Beizhu: sourceTask.Beizhu, // 备注 -> 备注
SuozaiCJ: sourceTask.SuozaiCJ, // 所在车间 -> 所在车间
// ========== 目标表独有字段(默认值) ==========
XiugaiXSCN: null, // 修改小时产能(目标表独有)
XiugaiJSSJ: null, // 修改结束时间(目标表独有)
ShengchanSL: null, // 生产数量(目标表独有)
XiugaiQTSJ: null, // 修改齐套时间(目标表独有)
YaoqiuQTSJ: null, // 要求齐套时间(目标表独有)
PaichanKSSJ: null, // 排产开始时间(目标表独有)
XiugaiKSSJ: null, // 修改开始时间(目标表独有)
YaoqiuDLSJ: null, // 要求到料时间(目标表独有)
QitaoS: null, // 齐套数(目标表独有)
PaichanJSSJ: null, // 排产结束时间(目标表独有)
JiagongSC: null, // 加工时长(目标表独有)
// ShangdaoRWZ: sourceTask.ShangdaoRWZ, // 【注意】源表为int,目标表为varchar(100),类型不同
ShangdaoRWZ: sourceTask.ShangdaoRWZ ? String(sourceTask.ShangdaoRWZ) : null, // 上道任务栈(int -> varchar)
QitaoWLSD: null // 齐套物料锁定(目标表独有)
// ========== 源表独有字段(不复制) ==========
// GongyiLCID: sourceTask.GongyiLCID, // 工艺流程Id(源表独有,不复制)
// RenwuZID: sourceTask.RenwuZID, // 任务栈Id(源表独有,不复制)
// ChanchuP: sourceTask.ChanchuP, // 产成品(源表独有,不复制)
// ChanxianSL: sourceTask.ChanxianSL // 产线条数(源表独有,不复制)
});
}
if (taskStackInsertList.length > 0) {
var taskStackInsertResult = V8.FormEngine.AddTableData(taskStackInsertList, V8.DbTrans);
if (taskStackInsertResult.Code != 1) {
V8.Cache.Remove(lockCacheKey);
return {
Code: 0,
Msg: '插入任务栈列表失败:' + taskStackInsertResult.Msg,
DataAppend: {
planRecord: planRecord,
DebugLog: isDebug ? debugLog : null
}
};
}
taskStackInsertCount += taskStackInsertList.length;
}
// ==================== 步骤7:插入【用料清单】子表 ====================
// 查找对应的【生产需求订单】记录(根据XuqiuDDH)
var orderRecord = null;
for (var k = 0; k < requirementOrders.length; k++) {
if (requirementOrders[k].XuqiuDDH === planRecord.XuqiuDDH) {
orderRecord = requirementOrders[k];
break;
}
}
if (!orderRecord) {
continue;
}
// 查询【生产需求订单-生产物料清单】
var materialQuery = V8.FormEngine.GetTableData('diy_scwlqd', {
_Where: [
['RequirementOrderId', '=', orderRecord.Id]
],
_PageSize: 1000
}, V8.DbTrans);
if (materialQuery.Code != 1) {
V8.Cache.Remove(lockCacheKey);
return {
Code: 0,
Msg: '查询生产物料清单失败:' + materialQuery.Msg,
DataAppend: {
DebugLog: isDebug ? debugLog : null
}
};
}
var materialList = materialQuery.Data || [];
// 复制物料清单到【APS生产主计划_用料清单】
var materialInsertList = [];
for (var m = 0; m < materialList.length; m++) {
var sourceMaterial = materialList[m];
materialInsertList.push({
FormEngineKey: 'diy_materialInput17666524183101766720999968',
RequirementOrderId: planRecord.Id, // 关联到生产主计划Id
// ========== 字段映射 ==========
// Cunhuo: sourceMaterial.Zijian, // 【源】子件 -> 【目标】存货
Cunhuo: sourceMaterial.Zijian, // 子件 -> 存货
// CunhuoID: sourceMaterial.ZijianID, // 【源】ZijianID -> 【目标】存货Id
CunhuoID: sourceMaterial.ZijianID, // ZijianID -> 存货Id
// CunhuoGG: sourceMaterial.ZijianGG, // 【源】子件规格 -> 【目标】存货规格
CunhuoGG: sourceMaterial.ZijianGG, // 子件规格 -> 存货规格
DanweiSYL: sourceMaterial.DanweiSYL, // 单位使用量 -> 单位使用量(字段名相同)
JiliangDW: sourceMaterial.JiliangDW, // 计量单位 -> 计量单位(字段名相同)
// SunhaoL: sourceMaterial.ZijianSHL, // 【源】子件损耗率 -> 【目标】损耗率
SunhaoL: sourceMaterial.ZijianSHL, // 子件损耗率 -> 损耗率
// ========== 源表独有字段(无法映射,不复制或特殊处理) ==========
// 【源】ZijianBM: sourceMaterial.ZijianBM, // 子件编码(目标表无此字段)
// 【源】ZijianMC: sourceMaterial.ZijianMC, // 子件名称(目标表无此字段)
// 【源】ZijianLX: sourceMaterial.ZijianLX, // 子件类型(目标表无此字段)
// 【源】YinglingSL: sourceMaterial.YinglingSL, // 应领数量(目标表无此字段)
// 【源】ShengchanYLQDFLNM: sourceMaterial.ShengchanYLQDFLNM, // 生产用料清单内码(目标表无此字段)
// 【源】ZijianSX: sourceMaterial.ZijianSX, // 子件属性(目标表无此字段)
// 【源】ShifouDC: sourceMaterial.ShifouDC, // 是否倒冲(目标表无此字段)
// 【源】JibenYL: sourceMaterial.JibenYL, // 基本用量(目标表无此字段)
// 【源】FApproveDate: sourceMaterial.FApproveDate, // 金蝶审核时间(目标表无此字段)
// 【源】FREPLACEGROUP: sourceMaterial.FREPLACEGROUP, // 项次(目标表无此字段)
// 【源】JichuSL: sourceMaterial.JichuSL, // 基础用量(目标表无此字段)
// ========== 特殊处理:类型不同的字段 ==========
// 【源】ShifouGDYL (int) vs 【目标】GudingYL (decimal)
// GudingYL: sourceMaterial.ShifouGDYL ? 1 : 0, // 是否固定用量 -> 固定用量(int转decimal)
GudingYL: sourceMaterial.ShifouGDYL, // 是否固定用量 -> 固定用量(待人工确认)
// ========== 目标表独有字段(默认值) ==========
DantiKZ: null, // 单体克重(目标表独有)
GongyiLXID: gongyiRecord.Id, // 工艺路线Id(目标表独有,使用当前工艺路线Id)
GongxuID: null, // 工序Id(目标表独有)
ZhucaiBZ: null // 主材标志(目标表独有)
});
}
if (materialInsertList.length > 0) {
var materialInsertResult = V8.FormEngine.AddTableData(materialInsertList, V8.DbTrans);
if (materialInsertResult.Code != 1) {
V8.Cache.Remove(lockCacheKey);
return {
Code: 0,
Msg: '插入用料清单失败:' + materialInsertResult.Msg,
DataAppend: {
planRecord: planRecord,
DebugLog: isDebug ? debugLog : null
}
};
}
materialInsertCount += materialInsertList.length;
}
}
debugLog.taskStackInsertCount = taskStackInsertCount;
debugLog.materialInsertCount = materialInsertCount;
debugLog.noGongyiCount = noGongyiCount;
// ==================== 步骤8:完成处理 ====================
V8.Cache.Set(progressCacheKey, JSON.stringify({
status: 'completed',
step: '引入完成',
progress: 100,
total: 100,
insertCount: insertList.length,
updateCount: updateList.length,
skipCount: skipList.length,
endTime: formatDateTime(new Date())
}));
// 清理锁
V8.Cache.Remove(lockCacheKey);
debugLog.endTime = formatDateTime(new Date());
// ==================== 返回结果 ====================
return {
Code: 1,
Data: {
insertCount: insertList.length,
updateCount: updateList.length,
skipCount: skipList.length,
taskStackCount: taskStackInsertCount,
materialCount: materialInsertCount,
noGongyiCount: noGongyiCount
},
Msg: '引入成功!新增 ' + insertList.length + ' 条,更新 ' + updateList.length + ' 条,跳过 ' + skipList.length + ' 条。' +
'插入任务栈 ' + taskStackInsertCount + ' 条,用料清单 ' + materialInsertCount + ' 条。',
DataAppend: {
DebugLog: isDebug ? debugLog : null
}
};
} catch (error) {
// 清理锁和进度缓存
V8.Cache.Remove(lockCacheKey);
V8.Cache.Remove(progressCacheKey);
// 收集详细的错误信息
debugLog.errorDetails = {
message: error.message || '',
toString: error.toString ? error.toString() : '',
stack: error.stack || '',
lineNumber: error.lineNumber || '',
columnNumber: error.columnNumber || '',
fileName: error.fileName || '',
name: error.name || '',
description: error.description || ''
};
var errorMsg = '引入生产主计划发生异常:' + (error.message || error.toString());
if (error.lineNumber) {
errorMsg += ' (行号: ' + error.lineNumber + ')';
}
if (error.stack) {
errorMsg += '\n堆栈: ' + error.stack;
}
return {
Code: 0,
Msg: errorMsg,
DataAppend: {
DebugLog: isDebug ? debugLog : null
}
};
}Describe the business logic 3
Expand View Code (34 lines)
【我的需求】:
现在讲我需要实现的业务逻辑,请帮我写好相关接口引擎,请存放接口引擎的js文件到【AI-Project/microi/】下,
1、首先你要知道这几张表结构:
	【生产主计划】:【diy_scxqdd1766715873794 (APS生产总计划)】
		子表【生产主计划-任务栈列表】:【diy_APSgylxsczx1766717760801 (APS生产主计划-任务栈列表) 】,
			子表的RequirementOrderId字段与主表Id关联,我已经增加了【生产主计划-任务栈列表】的【RequirementOrderId】字段,
			你的数据库json文件中可能没有,你现在认为有。
		子表【生产主计划-用料清单】:【diy_materialInput17666524183101766720999968 (APS生产主计划_用料清单) 】,
			子表RequirementOrderId与主表Id关联。

	【生产需求订单】:【diy_scxqdd (生产需求订单)】
		子表【生产需求订单-生产物料清单】:【diy_scwlqd (生产物料清单)】,子表RequirementOrderId与主表Id关联

	【存货档案】:【diy_chda_new (存货档案)】

	【APS工艺流程】:【diy_gylx1766652316974 (APS工艺路线) 】
		子表【APS工艺流程-任务栈列表】:【diy_APSgylxsczx (APS工艺路线-任务栈列表) 】,子表GongyiLCID与主表Id关联

	【生产主计划】与【生产需求订单】通过两边的【XuqiuDDH】字段进行1对1关联

	【生产主计划】与【APS工艺流程】通过两边的【CunhuoBM】字段进行1对1关联,关联查询时只取【APS工艺流程】【ShifouTY <> 1】的数据

现在我要给【生产主计划】新增一个【计算】功能,计算逻辑:
1、先获取一个月内的【生产主计划】数据,然后循环每条数据的子表【生产主计划-任务栈列表】
2、对子表【生产主计划-任务栈列表】的每一条数据进行重新计算修改值,需要计算的字段公式如下:
    2.1、【加工时长 JiagongSC】类型:外购(委外)隐藏,等于生产数量/小时产能
    2.2、【生产系数 ShengchanXS】订单数量x生产系数=该生产中心生产数量,默认是1
    2.3、【排产开始时间 PaichanKSSJ】类型:自制
                                如果叠加天数>0的,等于下道开工日-叠加天数
                                如果叠加天数,<=0,等于本道结束时间-  (生产数量/(小时产能*产线条数))/每天工作时长)*交期放大比例
                                类型:外购(委外)隐藏
    2.4、【要求到料时间 YaoqiuDLSJ】类型:外购(委外),要求到料时间=下道开工时间-前置天数
2.5、【排产结束时间 PaichanJSSJ】类型:等于下道开工时间-前置天数,类型:外购(委外)隐藏Describe the business logic 4
Expand to view code (34 lines)
【我的需求】:
现在讲我需要实现的业务逻辑,请帮我写好相关接口引擎,请存放接口引擎的js文件到【AI-Project/microi/】下,
1、首先你要知道这几张表结构:
	【生产主计划】:【diy_scxqdd1766715873794 (APS生产总计划)】
		子表【生产主计划-任务栈列表】:【diy_APSgylxsczx1766717760801 (APS生产主计划-任务栈列表) 】,
			子表的RequirementOrderId字段与主表Id关联,我已经增加了【生产主计划-任务栈列表】的【RequirementOrderId】字段,
			你的数据库json文件中可能没有,你现在认为有。
		子表【生产主计划-用料清单】:【diy_materialInput17666524183101766720999968 (APS生产主计划_用料清单) 】,
			子表RequirementOrderId与主表Id关联。

	【生产需求订单】:【diy_scxqdd (生产需求订单)】
		子表【生产需求订单-生产物料清单】:【diy_scwlqd (生产物料清单)】,子表RequirementOrderId与主表Id关联

	【存货档案】:【diy_chda_new (存货档案)】

	【APS工艺流程】:【diy_gylx1766652316974 (APS工艺路线) 】
		子表【APS工艺流程-任务栈列表】:【diy_APSgylxsczx (APS工艺路线-任务栈列表) 】,子表GongyiLCID与主表Id关联

	【生产主计划】与【生产需求订单】通过两边的【XuqiuDDH】字段进行1对1关联

	【生产主计划】与【APS工艺流程】通过两边的【CunhuoBM】字段进行1对1关联,关联查询时只取【APS工艺流程】【ShifouTY <> 1】的数据

现在我要给【生产主计划】新增一个【计算】功能,计算逻辑:
1、先获取一个月内的【生产主计划】数据,然后循环每条数据的子表【生产主计划-任务栈列表】
2、对子表【生产主计划-任务栈列表】的每一条数据进行重新计算修改值,需要计算的字段公式如下:
    2.1、【加工时长 JiagongSC】类型:外购(委外)隐藏,等于生产数量/小时产能
    2.2、【生产系数 ShengchanXS】订单数量x生产系数=该生产中心生产数量,默认是1
    2.3、【排产开始时间 PaichanKSSJ】类型:自制
                                如果叠加天数>0的,等于下道开工日-叠加天数
                                如果叠加天数,<=0,等于本道结束时间-  (生产数量/(小时产能*产线条数))/每天工作时长)*交期放大比例
                                类型:外购(委外)隐藏
    2.4、【要求到料时间 YaoqiuDLSJ】类型:外购(委外),要求到料时间=下道开工时间-前置天数
2.5、【排产结束时间 PaichanJSSJ】类型:等于下道开工时间-前置天数,类型:外购(委外)隐藏Summary
- by the blog main project practice, as long as the description
足够准确,AIGenerated接口引擎代码The correct rate is almost100%
Local (server) deployment of the Microi.AI engine
- Docker will automatically create the required data directory, no need to manually create it
- orchestration deployment through docker
Expand View Shell Commands (50 lines)
version: '3.8'
services:
  # Ollama AI 服务(使用阿里云镜像加速)
  microi-ollama:
    image: registry.cn-hangzhou.aliyuncs.com/microios/ollama:latest  # 使用阿里云镜像,也可使用日期版本如 :20260129
    container_name: microi-ollama
    ports:
      - "1434:11434"  # 如需修改端口,直接改这里,如 "8080:11434"
    volumes:
      - /microi/ollama/data:/root/.ollama  # 持久化模型数据(统一存储在/microi目录下)
    restart: always  # 开机自动启动
    environment:
      - OLLAMA_HOST=0.0.0.0:11434
    healthcheck:
      test: ["CMD", "/bin/sh", "-c", "ollama list || exit 1"]
      interval: 10s
      timeout: 5s
      retries: 5
      start_period: 10s
    networks:
      - microi-ollama-network

networks:
  microi-ollama-network:
    driver: bridge

# =====================================================
# Microi.net 专用 Ollama + DeepSeek 部署方案
# 使用阿里云镜像加速
# =====================================================
#
# 【验证部署】
#   curl http://localhost:1434/api/tags
#   docker exec microi-ollama ollama list
#
# 【测试AI对话】
#   curl http://localhost:1434/v1/chat/completions \
#     -H "Content-Type: application/json" \
#     -d '{
#       "model": "deepseek-r1:1.5b",
#       "messages": [{"role": "user", "content": "你好"}]
#     }'
#
# 【下载其他模型】
#   docker exec microi-ollama ollama pull deepseek-r1:7b # 下载7B模型
#   docker exec microi-ollama ollama pull deepseek-coder:1.3b # 下载Coder模型
#   docker exec microi-ollama ollama pull deepseek-coder:6.7b # 下载Coder 6.7B模型
#   docker logs -f microi-ollama # 查看下载进度
#   docker exec microi-ollama ollama list # 查看已安装模型
# =====================================================
- Pull nomic-embed-text model (384-dimensional, for Chinese and English text)
docker exec microi-ollama ollama pull nomic-embed-text
- Test API
curl http://localhost:1434/v1/embeddings \
  -H "Content-Type: application/json" \
  -d '{"model": "nomic-embed-text", "input": "测试"}'
- Deploy Qdrant vector database
Expand to view Shell commands (93 lines)
version: '3.8'
services:
  # Qdrant向量数据库服务
  microi-qdrant:
    image: registry.cn-hangzhou.aliyuncs.com/microios/qdrant:latest
    container_name: microi-qdrant
    restart: unless-stopped

    # 端口映射
    ports:
      - "1333:6333"      # HTTP API端口
      - "1334:6334"      # gRPC端口(可选,高性能场景)

    # 数据卷挂载(持久化存储)
    volumes:
      - /microi/qdrant/storage:/qdrant/storage          # 主存储目录
      - /microi/qdrant/snapshots:/qdrant/snapshots      # 快照目录
      - /microi/qdrant/config:/qdrant/config            # 配置文件目录(可选)

    # 环境变量配置(所有优化配置)
    environment:
      # 安全配置(生产环境建议启用)
      - QDRANT__SERVICE__API_KEY=password123456         # API密钥(取消注释后启用)
      - QDRANT__SERVICE__ENABLE_TLS=false               # TLS加密(本地部署可关闭)

      # 核心配置
      - QDRANT__SERVICE__HTTP_PORT=6333
      - QDRANT__SERVICE__GRPC_PORT=6334

      # 性能优化配置
      - QDRANT__STORAGE__PERFORMANCE__MAX_SEARCH_THREADS=4          # 搜索线程数
      - QDRANT__STORAGE__PERFORMANCE__MAX_OPTIMIZATION_THREADS=2    # 优化线程数
      - QDRANT__STORAGE__PERFORMANCE__UPDATE_QUEUE_SIZE=100         # 更新队列大小

      # HNSW索引优化(提升搜索速度)
      - QDRANT__STORAGE__HNSW_INDEX__M=16                           # HNSW图的连接数(默认16)
      - QDRANT__STORAGE__HNSW_INDEX__EF_CONSTRUCT=100               # 构建时的搜索深度(默认100)

      # 内存优化
      - QDRANT__STORAGE__ON_DISK_PAYLOAD=true                       # 将Payload存储到磁盘(节省内存)
      - QDRANT__STORAGE__MMAP_THRESHOLD_KB=102400                   # 100MB以上使用mmap(减少内存占用)

      # 持久化与恢复
      - QDRANT__STORAGE__WAL__WAL_CAPACITY_MB=32                    # WAL日志容量(MB)
      - QDRANT__STORAGE__WAL__WAL_SEGMENTS_AHEAD=0                  # 提前创建WAL段数
      - QDRANT__STORAGE__SNAPSHOT_PATH=/qdrant/snapshots            # 快照路径

      # 日志配置
      - QDRANT__LOG_LEVEL=INFO                                      # 日志级别: TRACE, DEBUG, INFO, WARN, ERROR

      # 集群配置(单机部署可忽略)
      - QDRANT__CLUSTER__ENABLED=false                              # 是否启用集群模式

      # 资源限制(防止OOM)
      - QDRANT__STORAGE__OPTIMIZERS__MEMMAP_THRESHOLD_KB=102400     # mmap阈值
      - QDRANT__STORAGE__OPTIMIZERS__INDEXING_THRESHOLD_KB=20480    # 索引阈值(20MB)

    # 资源限制(根据服务器实际情况调整)
    #deploy:
    #  resources:
    #    limits:
    #      cpus: '4.0'              # 最大CPU核心数
    #      memory: 8G               # 最大内存

    # 健康检查(可选,如不需要可删除)
    # 作用:监控服务状态,自动重启失败的容器
    healthcheck:
      test: ["CMD", "curl", "-f", "http://localhost:6333/healthz"]
      interval: 30s
      timeout: 10s
      retries: 3
      start_period: 40s

    # 网络配置
    networks:
      - microi-qdrant-network

    # 标签(便于管理)
    labels:
      - "com.microi.service=qdrant"
      - "com.microi.description=Qdrant Vector Database for AI"
      - "com.microi.version=1.0"

# 网络定义
networks:
  microi-qdrant-network:
    driver: bridge  # 简单桥接网络,无需固定IP

# http://localhost:1333/healthz # 健康检查接口
# 管理界面: http://localhost:1333/dashboard
# 检查向量数据是否已初始化:
# http://localhost:1333/collections/microi_schema
# 查看 points_count 是否>0